> ## Documentation Index
> Fetch the complete documentation index at: https://docs.runpod.io/llms.txt
> Use this file to discover all available pages before exploring further.
# Deploy a chatbot with Gemma 3 and send requests using the OpenAI API
> Deploy a Serverless endpoint with Google's Gemma 3 model using vLLM and the OpenAI API to build an interactive chatbot.
export const ColdStartTooltip = () => {
return cold start;
};
export const WorkerTooltip = () => {
return worker;
};
export const EndpointTooltip = () => {
return endpoint;
};
export const ServerlessTooltip = () => {
return Serverless;
};
This tutorial walks you through deploying a with Google's Gemma 3 model using the vLLM worker. You'll deploy the `gemma-3-1b-it` instruction-tuned variant, a lightweight model that runs efficiently on a variety of GPUs.
By the end, you'll have a fully functional Serverless endpoint that can respond to chat-style prompts through the [OpenAI-compatible API](/serverless/vllm/openai-compatibility).
## Requirements
Before starting this tutorial, you'll need:
* A [Runpod account](https://www.runpod.io/console/signup) with available credits.
* A [Runpod API key](/get-started/api-keys).
* A [Hugging Face account](https://huggingface.co/join) and [access token](https://huggingface.co/settings/tokens).
* Python 3.8+ installed on your local machine.
* The OpenAI Python client (`pip install openai`).
## Step 1: Accept Google's terms on Hugging Face
Gemma 3 is a gated model on Hugging Face. Before deploying, go to the [Gemma 3 1B model page](https://huggingface.co/google/gemma-3-1b-it) and click **Agree and access repository** while logged into your Hugging Face account.
You must accept the terms using the same Hugging Face account that you'll use to generate your access token. Without accepting these terms, your deployment will fail to download the model.
## Step 2: Deploy the vLLM worker
Deploy a vLLM worker through the Runpod Hub with Gemma 3 as your model:
1. Open the [vLLM worker listing](https://console.runpod.io/hub/runpod-workers/worker-vllm) in the Runpod Hub.
2. Click **Deploy**, using the latest vLLM worker version.
3. In the **Model** field, enter: `google/gemma-3-1b-it`.
4. Under **Hugging Face access token**, enter your Hugging Face access token.
5. Click **Advanced** to expand the vLLM settings.
6. Set **Max Model Length** to `8192`.
7. Set **Data Type** to `bfloat16`.
8. Click **Next**.
9. Select a GPU with at least 16GB of VRAM (such as RTX A4000 or RTX 4000 Ada).
10. Click **Create Endpoint**.
We're using a lightweight model for this tutorial to reduce cost and speed up response times. For larger Gemma models, you'll need GPUs with more VRAM.
Your endpoint will begin initializing. This may take several minutes while Runpod provisions resources and downloads the model. You can monitor the deployment status on the [Serverless endpoints page](https://console.runpod.io/serverless).
## Step 3: Note your endpoint ID
Once your endpoint is deployed, make a note of your **Endpoint ID** from the endpoint details page. You'll need this to construct your API base URL.
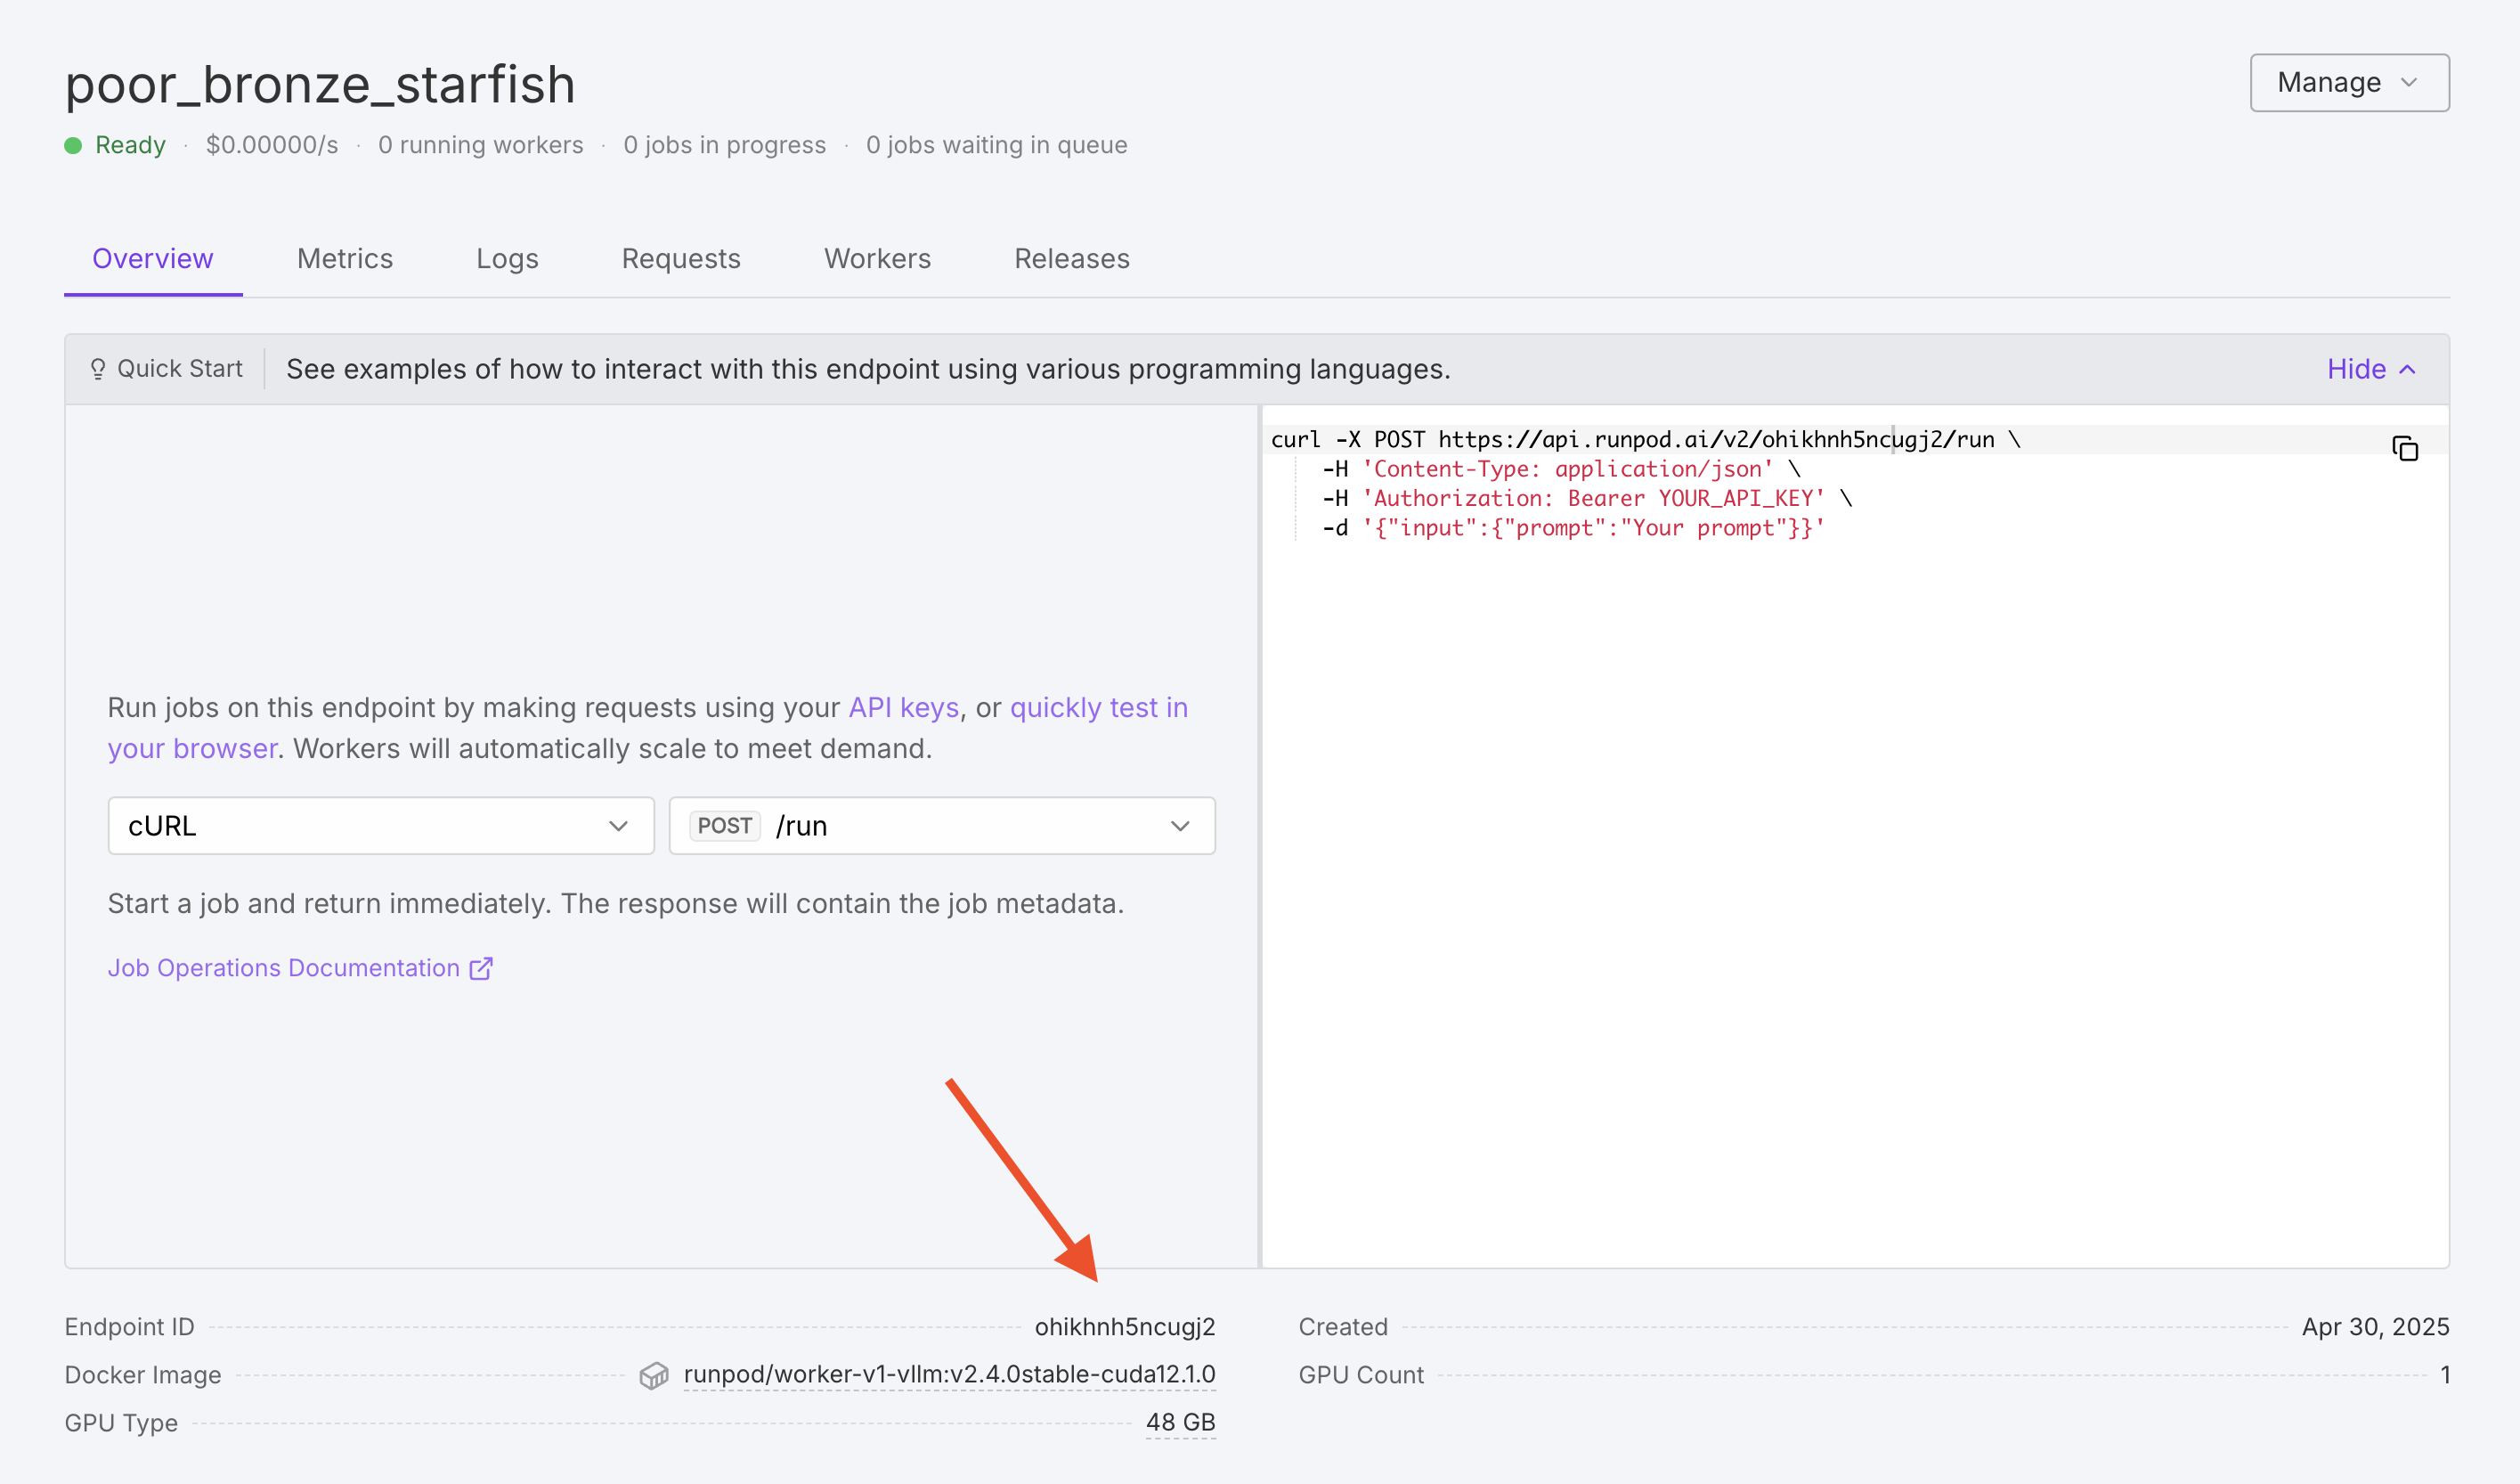 Your API base URL will follow this pattern:
```
https://api.runpod.ai/v2/{ENDPOINT_ID}/openai/v1
```
## Step 4: Test your endpoint
Before building a chatbot, verify that your endpoint is working correctly using a simple test request.
Set up your environment variables, replacing `YOUR_RUNPOD_API_KEY` and `YOUR_ENDPOINT_ID` with your actual API key and endpoint ID:
```bash theme={"theme":{"light":"github-light","dark":"github-dark"}}
export RUNPOD_API_KEY="YOUR_RUNPOD_API_KEY" && \
export RUNPOD_ENDPOINT_ID="YOUR_ENDPOINT_ID"
```
Send a test request using `curl`:
```bash theme={"theme":{"light":"github-light","dark":"github-dark"}}
curl "https://api.runpod.ai/v2/${RUNPOD_ENDPOINT_ID}/openai/v1/chat/completions" \
-H "Content-Type: application/json" \
-H "Authorization: Bearer ${RUNPOD_API_KEY}" \
-d '{
"model": "google/gemma-3-1b-it",
"messages": [
{"role": "user", "content": "Hello! What is your name?"}
],
"max_tokens": 100
}'
```
You should receive a JSON response containing the model's reply. If the request fails, check that:
* Your endpoint has finished initializing (status shows "Ready").
* Your `HF_TOKEN` environment variable is set correctly on the endpoint.
* You've accepted Google's terms on Hugging Face.
## Step 5: Build a chatbot
With your endpoint deployed, you can interact with it using the [OpenAI-compatible API](/serverless/vllm/openai-compatibility). The following example creates a command-line chatbot that maintains conversation history and generates responses using your deployed model.
Gemma 3 1B is a lightweight model optimized for efficiency. While it handles most conversational context well, it may give inconsistent responses to questions about personal information (like recalling names) due to its safety training. For more reliable multi-turn conversations, consider larger Gemma variants such as `gemma-3-4b-it` or `gemma-3-12b-it`.
Create a local Python file called `gemma_chat.py`:
```python gemma_chat.py theme={"theme":{"light":"github-light","dark":"github-dark"}}
from openai import OpenAI
import os
# Initialize the client with your Runpod endpoint
client = OpenAI(
base_url=f"https://api.runpod.ai/v2/{os.environ['RUNPOD_ENDPOINT_ID']}/openai/v1",
api_key=os.environ["RUNPOD_API_KEY"],
)
# Initialize conversation history
messages = [
{
"role": "system",
"content": "You are a helpful assistant.",
}
]
def display_chat_history(messages):
"""Display the conversation history."""
for message in messages:
if message["role"] != "system":
print(f"{message['role'].capitalize()}: {message['content']}")
def get_assistant_response(messages):
"""Get a response from the Gemma model."""
response = client.chat.completions.create(
model="google/gemma-3-1b-it",
messages=messages,
temperature=0.7,
top_p=0.9,
max_tokens=256,
)
return response.choices[0].message.content
def main():
print("Gemma 3 Chatbot")
print("Type 'quit' to exit.\n")
while True:
# Get user input
user_input = input("You: ")
if user_input.lower() == "quit":
print("Goodbye!")
break
# Add user message to history
messages.append({"role": "user", "content": user_input})
# Get and display response
response = get_assistant_response(messages)
messages.append({"role": "assistant", "content": response})
print(f"Assistant: {response}\n")
if __name__ == "__main__":
main()
```
Before running the script, install the OpenAI Python client and set your environment variables.
```bash theme={"theme":{"light":"github-light","dark":"github-dark"}}
pip install openai
```
Replace `YOUR_RUNPOD_API_KEY` and `YOUR_ENDPOINT_ID` with your actual API key and endpoint ID:
```bash theme={"theme":{"light":"github-light","dark":"github-dark"}}
export RUNPOD_API_KEY="YOUR_RUNPOD_API_KEY"
export RUNPOD_ENDPOINT_ID="YOUR_ENDPOINT_ID"
```
Run your chatbot script:
```bash theme={"theme":{"light":"github-light","dark":"github-dark"}}
python gemma_chat.py
```
The first request may take longer (30-60 seconds) due to as the endpoint loads the model into GPU memory. Subsequent requests complete in just a few seconds.
You can now have a conversation with Gemma 3:
```text theme={"theme":{"light":"github-light","dark":"github-dark"}}
Gemma 3 Chatbot
Type 'quit' to exit.
You: What are some fun facts about space?
Assistant: Here are some fun facts about space:
1. A day on Venus is longer than its year - Venus takes 243 Earth days to rotate once but only 225 Earth days to orbit the Sun.
2. There's a planet made of diamonds - 55 Cancri e is believed to be covered in graphite and diamond.
3. Space is completely silent - with no atmosphere to carry sound waves, space is eerily quiet.
You: quit
Goodbye!
```
## Next steps
You've successfully deployed Gemma 3 on Runpod Serverless and built a chatbot to interact with it. Here are some ways to extend this tutorial:
* [Configure your endpoint](/serverless/endpoints/endpoint-configurations) to optimize performance and cost.
* [Learn about vLLM environment variables](/serverless/vllm/environment-variables) to customize model behavior.
* [Explore OpenAI compatibility](/serverless/vllm/openai-compatibility) for features like streaming and function calling.
* Build a custom for more specialized use cases.
Your API base URL will follow this pattern:
```
https://api.runpod.ai/v2/{ENDPOINT_ID}/openai/v1
```
## Step 4: Test your endpoint
Before building a chatbot, verify that your endpoint is working correctly using a simple test request.
Set up your environment variables, replacing `YOUR_RUNPOD_API_KEY` and `YOUR_ENDPOINT_ID` with your actual API key and endpoint ID:
```bash theme={"theme":{"light":"github-light","dark":"github-dark"}}
export RUNPOD_API_KEY="YOUR_RUNPOD_API_KEY" && \
export RUNPOD_ENDPOINT_ID="YOUR_ENDPOINT_ID"
```
Send a test request using `curl`:
```bash theme={"theme":{"light":"github-light","dark":"github-dark"}}
curl "https://api.runpod.ai/v2/${RUNPOD_ENDPOINT_ID}/openai/v1/chat/completions" \
-H "Content-Type: application/json" \
-H "Authorization: Bearer ${RUNPOD_API_KEY}" \
-d '{
"model": "google/gemma-3-1b-it",
"messages": [
{"role": "user", "content": "Hello! What is your name?"}
],
"max_tokens": 100
}'
```
You should receive a JSON response containing the model's reply. If the request fails, check that:
* Your endpoint has finished initializing (status shows "Ready").
* Your `HF_TOKEN` environment variable is set correctly on the endpoint.
* You've accepted Google's terms on Hugging Face.
## Step 5: Build a chatbot
With your endpoint deployed, you can interact with it using the [OpenAI-compatible API](/serverless/vllm/openai-compatibility). The following example creates a command-line chatbot that maintains conversation history and generates responses using your deployed model.
Gemma 3 1B is a lightweight model optimized for efficiency. While it handles most conversational context well, it may give inconsistent responses to questions about personal information (like recalling names) due to its safety training. For more reliable multi-turn conversations, consider larger Gemma variants such as `gemma-3-4b-it` or `gemma-3-12b-it`.
Create a local Python file called `gemma_chat.py`:
```python gemma_chat.py theme={"theme":{"light":"github-light","dark":"github-dark"}}
from openai import OpenAI
import os
# Initialize the client with your Runpod endpoint
client = OpenAI(
base_url=f"https://api.runpod.ai/v2/{os.environ['RUNPOD_ENDPOINT_ID']}/openai/v1",
api_key=os.environ["RUNPOD_API_KEY"],
)
# Initialize conversation history
messages = [
{
"role": "system",
"content": "You are a helpful assistant.",
}
]
def display_chat_history(messages):
"""Display the conversation history."""
for message in messages:
if message["role"] != "system":
print(f"{message['role'].capitalize()}: {message['content']}")
def get_assistant_response(messages):
"""Get a response from the Gemma model."""
response = client.chat.completions.create(
model="google/gemma-3-1b-it",
messages=messages,
temperature=0.7,
top_p=0.9,
max_tokens=256,
)
return response.choices[0].message.content
def main():
print("Gemma 3 Chatbot")
print("Type 'quit' to exit.\n")
while True:
# Get user input
user_input = input("You: ")
if user_input.lower() == "quit":
print("Goodbye!")
break
# Add user message to history
messages.append({"role": "user", "content": user_input})
# Get and display response
response = get_assistant_response(messages)
messages.append({"role": "assistant", "content": response})
print(f"Assistant: {response}\n")
if __name__ == "__main__":
main()
```
Before running the script, install the OpenAI Python client and set your environment variables.
```bash theme={"theme":{"light":"github-light","dark":"github-dark"}}
pip install openai
```
Replace `YOUR_RUNPOD_API_KEY` and `YOUR_ENDPOINT_ID` with your actual API key and endpoint ID:
```bash theme={"theme":{"light":"github-light","dark":"github-dark"}}
export RUNPOD_API_KEY="YOUR_RUNPOD_API_KEY"
export RUNPOD_ENDPOINT_ID="YOUR_ENDPOINT_ID"
```
Run your chatbot script:
```bash theme={"theme":{"light":"github-light","dark":"github-dark"}}
python gemma_chat.py
```
The first request may take longer (30-60 seconds) due to as the endpoint loads the model into GPU memory. Subsequent requests complete in just a few seconds.
You can now have a conversation with Gemma 3:
```text theme={"theme":{"light":"github-light","dark":"github-dark"}}
Gemma 3 Chatbot
Type 'quit' to exit.
You: What are some fun facts about space?
Assistant: Here are some fun facts about space:
1. A day on Venus is longer than its year - Venus takes 243 Earth days to rotate once but only 225 Earth days to orbit the Sun.
2. There's a planet made of diamonds - 55 Cancri e is believed to be covered in graphite and diamond.
3. Space is completely silent - with no atmosphere to carry sound waves, space is eerily quiet.
You: quit
Goodbye!
```
## Next steps
You've successfully deployed Gemma 3 on Runpod Serverless and built a chatbot to interact with it. Here are some ways to extend this tutorial:
* [Configure your endpoint](/serverless/endpoints/endpoint-configurations) to optimize performance and cost.
* [Learn about vLLM environment variables](/serverless/vllm/environment-variables) to customize model behavior.
* [Explore OpenAI compatibility](/serverless/vllm/openai-compatibility) for features like streaming and function calling.
* Build a custom for more specialized use cases.