> ## Documentation Index
> Fetch the complete documentation index at: https://docs.runpod.io/llms.txt
> Use this file to discover all available pages before exploring further.

# Integrate Serverless with a web application

> Deploy an image generation endpoint from the Hub and integrate it into a web application.

export const ColdStartTooltip = () => {
  return <Tooltip headline="Cold start" tip="The time between when an endpoint with no running workers receives a request, and when a worker is fully warmed up and ready to handle the request." cta="Learn more about cold starts" href="/serverless/overview#cold-starts">cold start</Tooltip>;
};

export const WorkerTooltip = () => {
  return <Tooltip headline="Worker" tip="A container that runs your application code and processes requests to your Serverless endpoint. Workers are automatically started and stopped by Runpod to handle traffic spikes and ensure optimal resource utilization." cta="Learn more about workers" href="/serverless/workers/overview">worker</Tooltip>;
};

export const RunpodHubTooltip = () => {
  return <Tooltip headline="Runpod Hub" tip="A repository for discovering, deploying, and sharing preconfigured AI projects optimized for Runpod." cta="Learn more about Runpod Hub" href="/hub/overview">Runpod Hub</Tooltip>;
};

export const ServerlessTooltip = () => {
  return <Tooltip headline="Serverless" tip="A cloud computing platform that allows you to deploy AI/ML applications without provisioning or managing servers." cta="Learn more about Serverless" href="/serverless/overview">Serverless</Tooltip>;
};

In this tutorial, you'll deploy a pre-built SDXL Turbo <WorkerTooltip /> from the <RunpodHubTooltip /> and integrate it into a web application. You'll build a simple frontend that sends prompts to your endpoint and displays the generated images.

By the end, you'll know how to deploy <ServerlessTooltip /> endpoints from the Hub and integrate them into your applications using standard HTTP requests.

## Requirements

* A [Runpod account](/get-started/manage-accounts) with credits.
* A [Runpod API key](/get-started/api-keys).

## Step 1: Deploy an endpoint from the Hub

The Runpod Hub provides pre-built workers you can deploy with a few clicks. For this tutorial, you'll deploy the SDXL Turbo worker, which generates images from text prompts.

1. Navigate to the [Runpod Hub](https://www.console.runpod.io/hub) in the console.
2. Search for "SDXL-turbo" or browse the image generation category.
3. Select the SDXL-turbo worker to view its details and hardware requirements.
4. Click **Deploy** in the top-right corner of the page.
5. Click **Create Endpoint**.

Your endpoint will be ready within a few minutes. You can monitor the deployment status on your [Serverless endpoints page](https://www.console.runpod.io/serverless).

## Step 2: Find your endpoint ID and API key

Now that your endpoint is deployed, you'll need your endpoint ID and API key to make requests.

### Find your endpoint ID

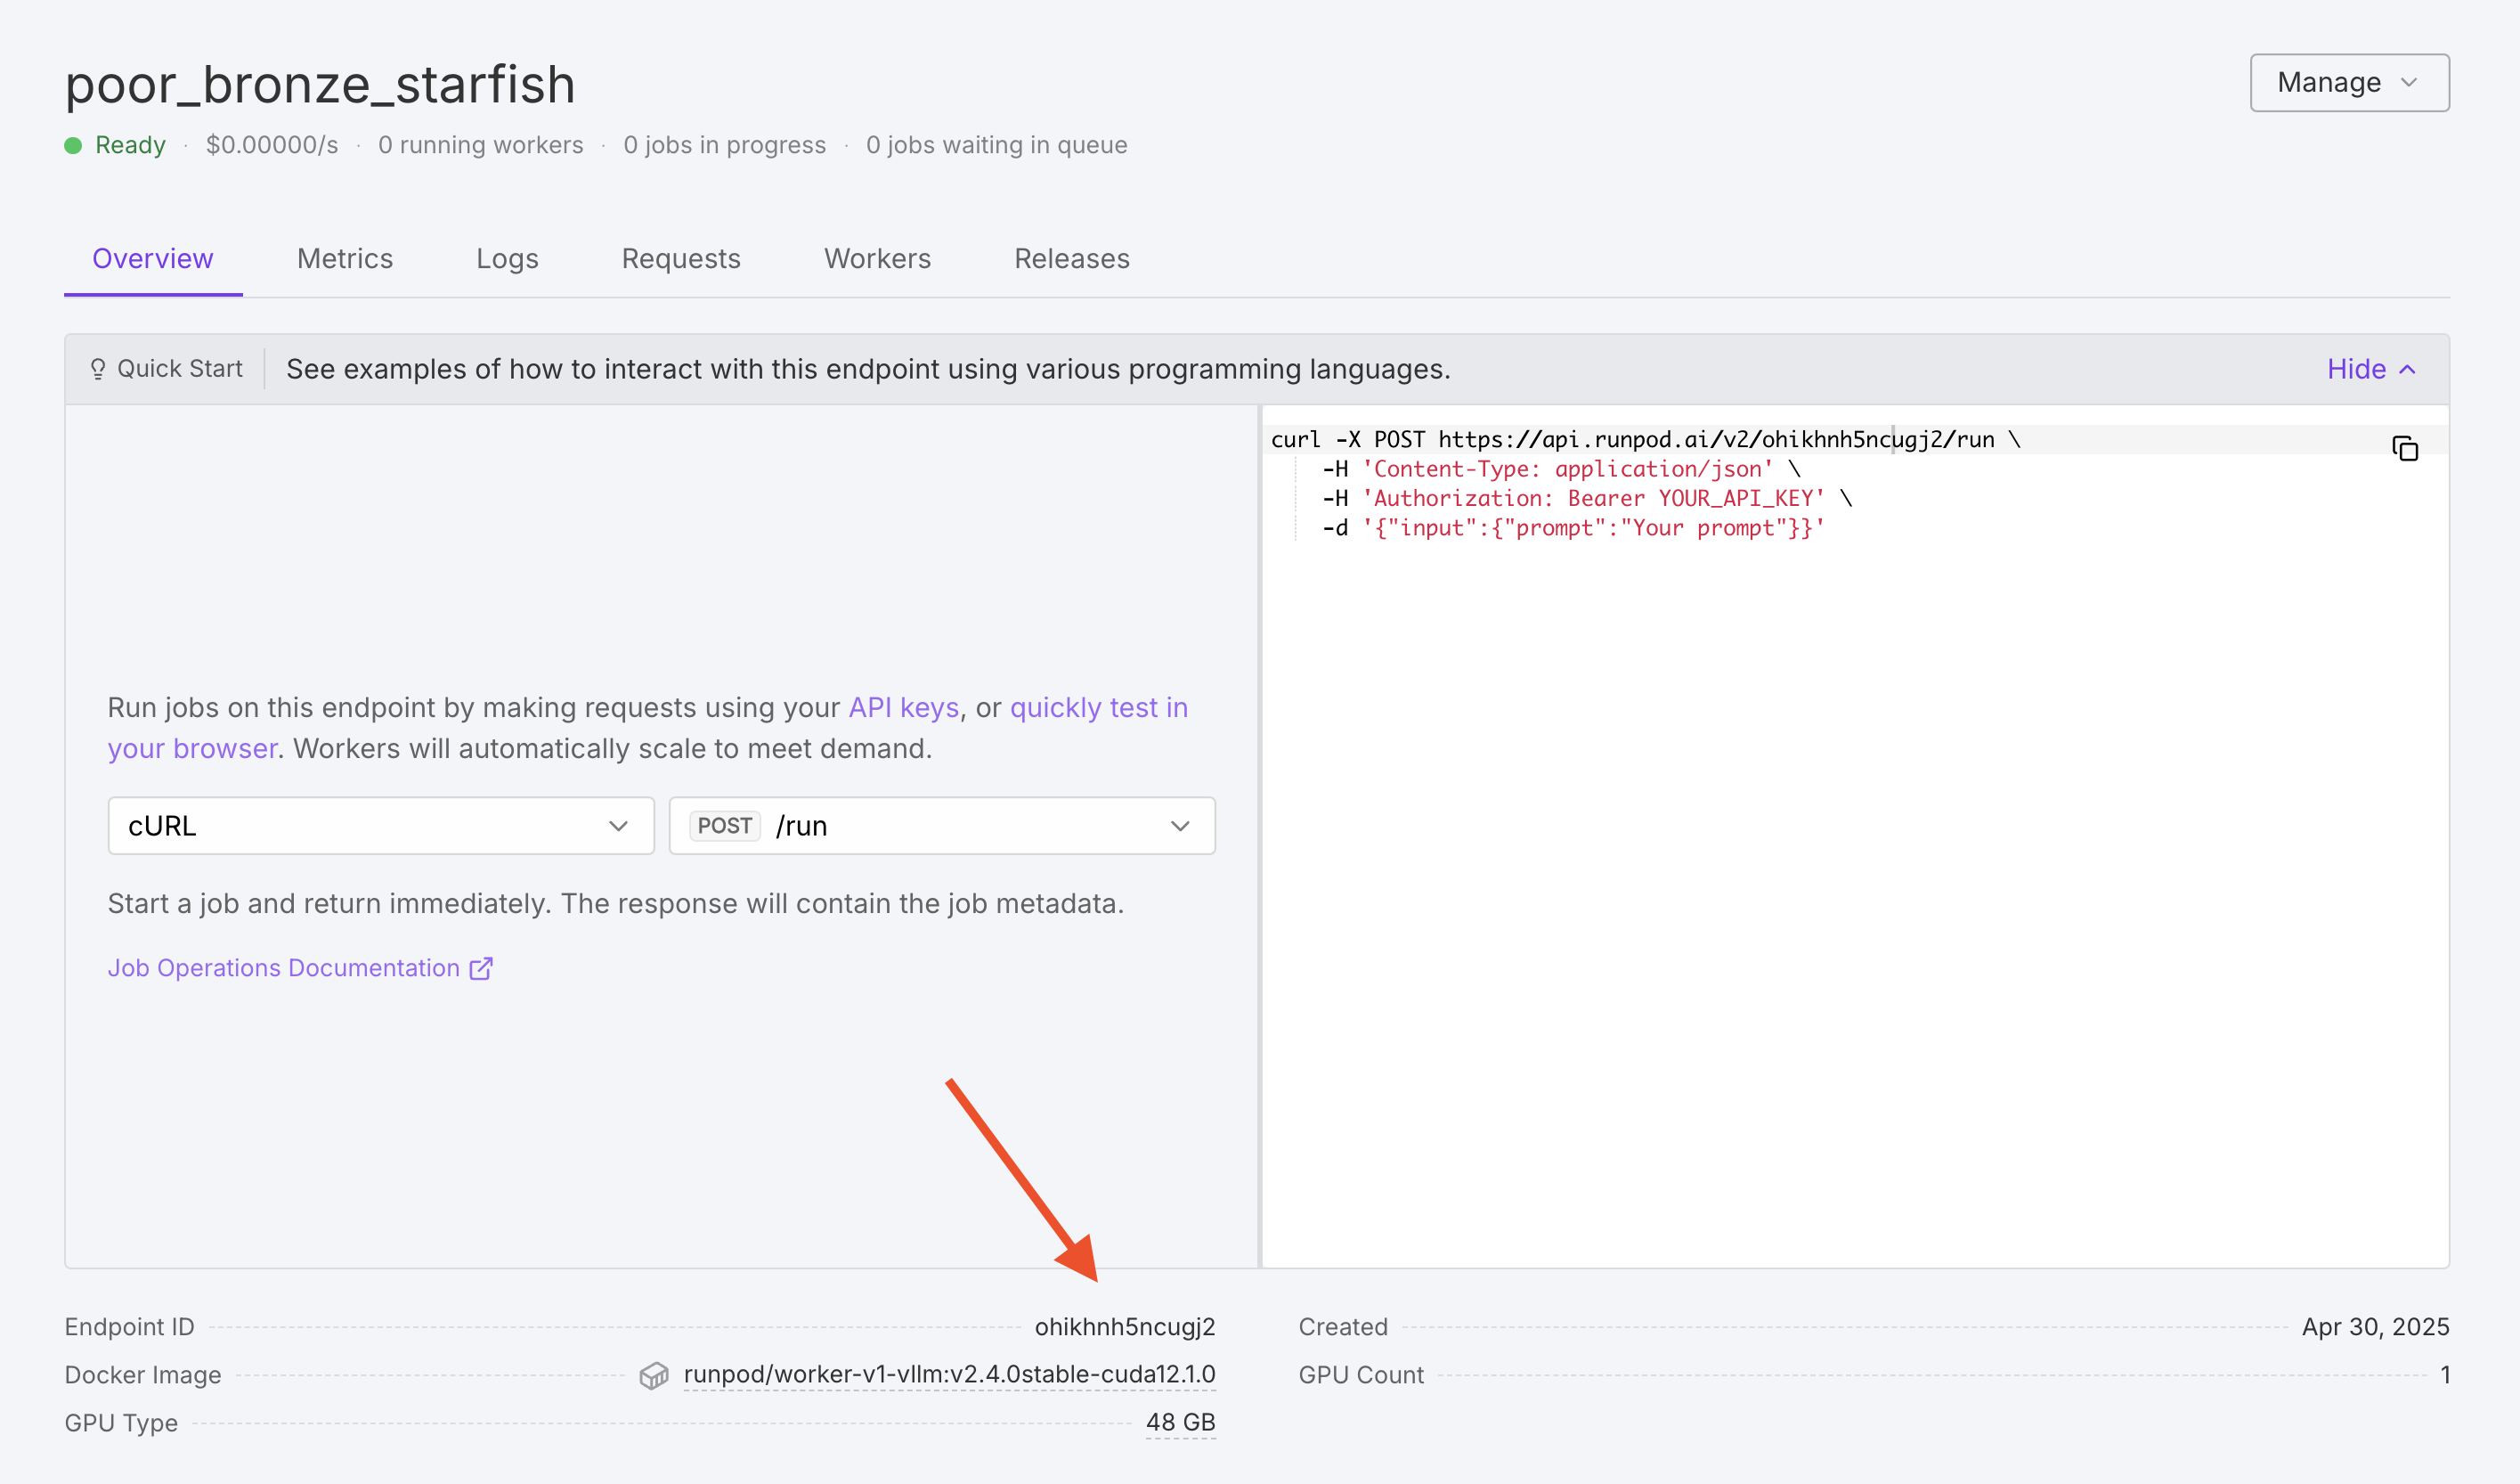
1. Go to your [Serverless endpoints page](https://www.console.runpod.io/serverless).
2. Click on your SDXL Turbo endpoint.
3. Copy the **Endpoint ID** shown at the top of the page.

<Frame>
  <img src="https://mintcdn.com/runpod-b18f5ded/QcR4sHy3480YmZ2d/images/4a0706af-serverless-endpoint-id.png?fit=max&auto=format&n=QcR4sHy3480YmZ2d&q=85&s=235877de98138f855d509ce42c2aa0b5" width="2830" height="1666" data-path="images/4a0706af-serverless-endpoint-id.png" />
</Frame>

### Find your API key

1. Navigate to **Settings** > **API Keys** in the console, or go directly to the [API Keys page](https://www.runpod.io/console/user/settings).
2. Copy an existing API key, or create a new one with read and write permissions.

<Tip>
  Store your API key securely. Never commit it to version control or expose it in client-side code that's publicly accessible.
</Tip>

## Step 3: Send a test request

Test your endpoint with a simple API request before integrating it into an application. The endpoint accepts a JSON payload with an `input` object containing your prompt.

<Tabs>
  <Tab title="cURL">
    ```bash theme={"theme":{"light":"github-light","dark":"github-dark"}}
    curl -X POST "https://api.runpod.ai/v2/${YOUR_ENDPOINT_ID}/runsync" \
         -H "accept: application/json" \
         -H "content-type: application/json" \
         -H "authorization: Bearer ${YOUR_API_KEY}" \
         -d '{
            "input": {
                "prompt": "A futuristic city skyline at sunset"
            }
         }'
    ```
  </Tab>

  <Tab title="Python">
    ```python theme={"theme":{"light":"github-light","dark":"github-dark"}}
    import requests

    endpoint_id = "YOUR_ENDPOINT_ID"
    api_key = "YOUR_API_KEY"

    response = requests.post(
        f"https://api.runpod.ai/v2/{endpoint_id}/runsync",
        headers={
            "accept": "application/json",
            "content-type": "application/json",
            "authorization": f"Bearer {api_key}",
        },
        json={
            "input": {
                "prompt": "A futuristic city skyline at sunset",
            }
        },
    )

    print(response.json())
    ```
  </Tab>

  <Tab title="Response">
    ```json theme={"theme":{"light":"github-light","dark":"github-dark"}}
    {
      "delayTime": 168,
      "executionTime": 2126,
      "id": "sync-fa542d19-92b2-47d0-8e58-c01878f0365d-u1",
      "output": {
        "generation_time": 0.72,
        "images": [
          {
            "image": "BASE_64_ENCODED_IMAGE"
          }
        ]
      },
      "status": "COMPLETED"
    }
    ```
  </Tab>
</Tabs>

Replace the following placeholders:

| Placeholder        | Description                   |
| ------------------ | ----------------------------- |
| `YOUR_ENDPOINT_ID` | Your endpoint ID from step 2. |
| `YOUR_API_KEY`     | Your Runpod API key.          |

The generated image is returned as a base64-encoded PNG string in `output.images[0].image`. For more information about request parameters and response formats, see [Send requests](/serverless/endpoints/send-requests).

SDXL Turbo uses adversarial diffusion distillation to generate images in just a few steps. The worker is pre-configured with optimal settings, so you only need to provide the `prompt` parameter, but you can also provide other parameters to control the generation process.

| Parameter             | Type    | Required | Default | Description                                    |
| --------------------- | ------- | -------- | ------- | ---------------------------------------------- |
| `prompt`              | string  | Yes      | -       | The prompt to generate an image from.          |
| `negative_prompt`     | string  | No       | -       | The negative prompt to exclude from the image. |
| `width`               | integer | No       | 1024    | The width of the image in pixels.              |
| `height`              | integer | No       | 1024    | The height of the image in pixels.             |
| `num_inference_steps` | integer | No       | 25      | The number of denoising steps.                 |

## Step 4: Integrate with a web application

Now that you've confirmed your endpoint is working, you can integrate it into a web application. This example creates a simple image generator with an input field for prompts and a button to generate images. While this tutorial uses JavaScript, you can make requests to your endpoint using any programming language or framework.

Create two files in the same directory:

<Tabs>
  <Tab title="index.html">
    The HTML file sets up a user interface with an input field for prompts and a button to generate images. Clicking the button calls the `generateImage` function in `script.js`.

    ```html index.html theme={"theme":{"light":"github-light","dark":"github-dark"}}
    <!DOCTYPE html>
    <html lang="en">
    <head>
        <meta charset="UTF-8">
        <meta name="viewport" content="width=device-width, initial-scale=1.0">
        <title>Runpod AI Image Generator</title>
        <style>
            body {
                font-family: Arial, sans-serif;
                max-width: 800px;
                margin: 0 auto;
                padding: 20px;
                text-align: center;
            }
            #promptInput {
                width: 100%;
                max-width: 500px;
                padding: 10px;
                font-size: 16px;
                margin-bottom: 10px;
            }
            button {
                padding: 10px 20px;
                font-size: 16px;
                cursor: pointer;
            }
            #imageResult {
                margin-top: 20px;
            }
            #imageResult img {
                max-width: 100%;
                height: auto;
            }
            #loading {
                display: none;
                margin-top: 20px;
            }
        </style>
    </head>
    <body>
        <h1>AI Image Generator</h1>
        <p>Enter a prompt to generate an image using SDXL Turbo.</p>
        
        <input type="text" id="promptInput" placeholder="A futuristic city skyline at sunset" />
        <br>
        <button onclick="generateImage()">Generate Image</button>
        
        <div id="loading">Generating image...</div>
        <div id="imageResult"></div>

        <script src="script.js"></script>
    </body>
    </html>
    ```
  </Tab>

  <Tab title="script.js">
    The JavaScript file handles API communication. The `generateImage` function reads the user's prompt, sends a POST request to your Runpod endpoint, and displays the generated image. The endpoint returns a base64-encoded PNG image in the `output.images` array, which is then converted to a displayable format.

    ```javascript script.js theme={"theme":{"light":"github-light","dark":"github-dark"}}
    // Replace these with your actual values
    const ENDPOINT_ID = "YOUR_ENDPOINT_ID";
    const API_KEY = "YOUR_API_KEY";

    async function generateImage() {
        const prompt = document.getElementById("promptInput").value;

        if (!prompt) {
            alert("Please enter a prompt!");
            return;
        }

        // Show loading indicator
        document.getElementById("loading").style.display = "block";
        document.getElementById("imageResult").innerHTML = "";

        const options = {
            method: "POST",
            headers: {
                "accept": "application/json",
                "content-type": "application/json",
                "authorization": `Bearer ${API_KEY}`,
            },
            body: JSON.stringify({
                input: {
                    prompt: prompt,
                },
            }),
        };

        try {
            const response = await fetch(
                `https://api.runpod.ai/v2/${ENDPOINT_ID}/runsync`,
                options
            );
            const data = await response.json();

            // Hide loading indicator
            document.getElementById("loading").style.display = "none";

            if (data && data.output && data.output.images && data.output.images.length > 0) {
                const imageBase64 = data.output.images[0].image;
                const imageUrl = `data:image/png;base64,${imageBase64}`;
                document.getElementById("imageResult").innerHTML =
                    `<img src="${imageUrl}" alt="Generated Image" />`;
            } else if (data && data.error) {
                alert(`Error: ${data.error}`);
            } else {
                alert("Failed to generate image. Check the console for details.");
                console.error("Response:", data);
            }
        } catch (error) {
            document.getElementById("loading").style.display = "none";
            console.error("Error:", error);
            alert("Error generating image. Check the console for details.");
        }
    }
    ```
  </Tab>
</Tabs>

Before running the application:

1. Replace `YOUR_ENDPOINT_ID` with your endpoint ID from step 2.
2. Replace `YOUR_API_KEY` with your Runpod API key.

<Warning>
  This example includes the API key directly in client-side code for simplicity. In production, you should make API calls from a backend server to keep your API key secure.
</Warning>

## Step 5: Run your application

You can run the application using a local server or by opening the HTML file directly in a browser.

<Tabs>
  <Tab title="Python server">
    Run the following command in the directory containing your files:

    ```bash theme={"theme":{"light":"github-light","dark":"github-dark"}}
    python -m http.server 8000
    ```

    Then open `http://localhost:8000` in your browser.
  </Tab>

  <Tab title="Open directly">
    1. Navigate to the folder containing `index.html`.
    2. Double-click the file to open it in your default browser, or right-click and select **Open with** to choose a specific browser.
  </Tab>
</Tabs>

Enter a prompt and click **Generate Image** to see your AI-generated image.

<Tip>
  The first request may take longer (30-60 seconds) due to <ColdStartTooltip /> as the endpoint loads the model into GPU memory. Subsequent requests complete in just a few seconds.
</Tip>

## Next steps

Now that you've integrated a Serverless endpoint into a web application, you can:

* [Explore other workers on the Hub](/hub/overview) for different AI capabilities.
* [Learn about asynchronous requests](/serverless/endpoints/operations) for handling long-running jobs.
* [Build your own custom worker](/serverless/workers/overview) to deploy your own models.
* [Use the Python SDK](/sdks/python/endpoints) for more advanced integrations.
