> ## Documentation Index
> Fetch the complete documentation index at: https://docs.runpod.io/llms.txt
> Use this file to discover all available pages before exploring further.
# Deploy an Instant Cluster with PyTorch
export const PyTorchTooltip = () => {
return PyTorch;
};
This tutorial demonstrates how to use [Instant Clusters](/instant-clusters) with to run distributed workloads across multiple GPUs. By leveraging PyTorch's distributed processing capabilities and Runpod's high-speed networking infrastructure, you can significantly accelerate your training process compared to single-GPU setups.
## Requirements
* A Runpod account with sufficient credits for a multi-node cluster
* Basic familiarity with PyTorch and distributed training concepts
## Step 1: Deploy an Instant Cluster
1. Open the [Instant Clusters page](https://www.console.runpod.io/cluster) on the Runpod web interface.
2. Click **Create Cluster**.
3. Use the UI to name and configure your Cluster. For this walkthrough, keep **Pod Count** at **2** and select the option for **16x H100 SXM** GPUs. Keep the **Pod Template** at its default setting (Runpod PyTorch).
4. Click **Deploy Cluster**. You should be redirected to the Instant Clusters page after a few seconds.
## Step 2: Clone the PyTorch demo into each Pod
1. Click your cluster to expand the list of Pods.
2. Click on a Pod, for example `CLUSTERNAME-pod-0`, to expand the Pod.
3. Click **Connect**, then click **Web Terminal**.
4. In the terminal that opens, run this command to clone a basic `main.py` file into the Pod's main directory:
```sh theme={"theme":{"light":"github-light","dark":"github-dark"}}
git clone https://github.com/murat-runpod/torch-demo.git
```
Repeat these steps for **each Pod** in your cluster.
## Step 3: Examine the main.py file
Let's look at the code in our `main.py` file:
```python main.py theme={"theme":{"light":"github-light","dark":"github-dark"}}
import os
import torch
import torch.distributed as dist
def init_distributed():
"""Initialize the distributed training environment"""
# Initialize the process group
dist.init_process_group(backend="nccl")
# Get local rank and global rank
local_rank = int(os.environ["LOCAL_RANK"])
global_rank = dist.get_rank()
world_size = dist.get_world_size()
# Set device for this process
device = torch.device(f"cuda:{local_rank}")
torch.cuda.set_device(device)
return local_rank, global_rank, world_size, device
def cleanup_distributed():
"""Clean up the distributed environment"""
dist.destroy_process_group()
def main():
# Initialize distributed environment
local_rank, global_rank, world_size, device = init_distributed()
print(f"Running on rank {global_rank}/{world_size-1} (local rank: {local_rank}), device: {device}")
# Your code here
# Clean up distributed environment when done
cleanup_distributed()
if __name__ == "__main__":
main()
```
This is the minimal code necessary for initializing a distributed environment. The `main()` function prints the local and global rank for each GPU process (this is also where you can add your own code).
PyTorch assigns `LOCAL_RANK` dynamically to each process. All other environment variables are set automatically by Runpod when you deploy your cluster:
| Variable | Description |
| ------------------------------ | ---------------------------------------------------- |
| `MASTER_ADDR` / `PRIMARY_ADDR` | Address of the primary node for process coordination |
| `MASTER_PORT` / `PRIMARY_PORT` | Port on the primary node |
| `NUM_NODES` | Number of nodes in your cluster |
| `NUM_TRAINERS` | Number of GPUs per node |
| `NODE_RANK` | This node's rank in the cluster (0 for primary) |
| `WORLD_SIZE` | Total GPUs across all nodes |
For a complete list of environment variables, see the [configuration reference](/instant-clusters/configuration#environment-variables).
## Step 4: Start the PyTorch process on each Pod
Run this command in the web terminal of **each Pod** to start the PyTorch process:
```bash launcher.sh theme={"theme":{"light":"github-light","dark":"github-dark"}}
export NCCL_DEBUG=INFO
export NCCL_SOCKET_IFNAME=ens1
torchrun \
--nproc_per_node=$NUM_TRAINERS \
--nnodes=$NUM_NODES \
--node_rank=$NODE_RANK \
--master_addr=$MASTER_ADDR \
--master_port=$MASTER_PORT \
torch-demo/main.py
```
This command launches eight `main.py` processes per node (one per GPU in the Pod).
The `NCCL_SOCKET_IFNAME=ens1` setting tells NCCL to use the high-speed internal network interface (`ens1`) for GPU-to-GPU communication between nodes. Instant Clusters provide up to 8 high-bandwidth interfaces (`ens1`-`ens8`) for inter-node traffic, separate from `eth0` which handles external internet traffic.
The `NCCL_DEBUG=INFO` setting enables detailed logging, which is helpful for troubleshooting communication issues. For more information on NCCL configuration and troubleshooting, see the [configuration reference](/instant-clusters/configuration#nccl-configuration).
The `NCCL_SOCKET_IFNAME=ens1` setting is critical for proper inter-node communication. Without this configuration, nodes may attempt to communicate using external IP addresses (172.xxx range) instead of the internal network interface, leading to connection timeouts and failed distributed training jobs.
### Expected output
After running the command on the last Pod, you should see output similar to this:
```csharp theme={"theme":{"light":"github-light","dark":"github-dark"}}
Running on rank 8/15 (local rank: 0), device: cuda:0
Running on rank 15/15 (local rank: 7), device: cuda:7
Running on rank 9/15 (local rank: 1), device: cuda:1
Running on rank 12/15 (local rank: 4), device: cuda:4
Running on rank 13/15 (local rank: 5), device: cuda:5
Running on rank 11/15 (local rank: 3), device: cuda:3
Running on rank 14/15 (local rank: 6), device: cuda:6
Running on rank 10/15 (local rank: 2), device: cuda:2
```
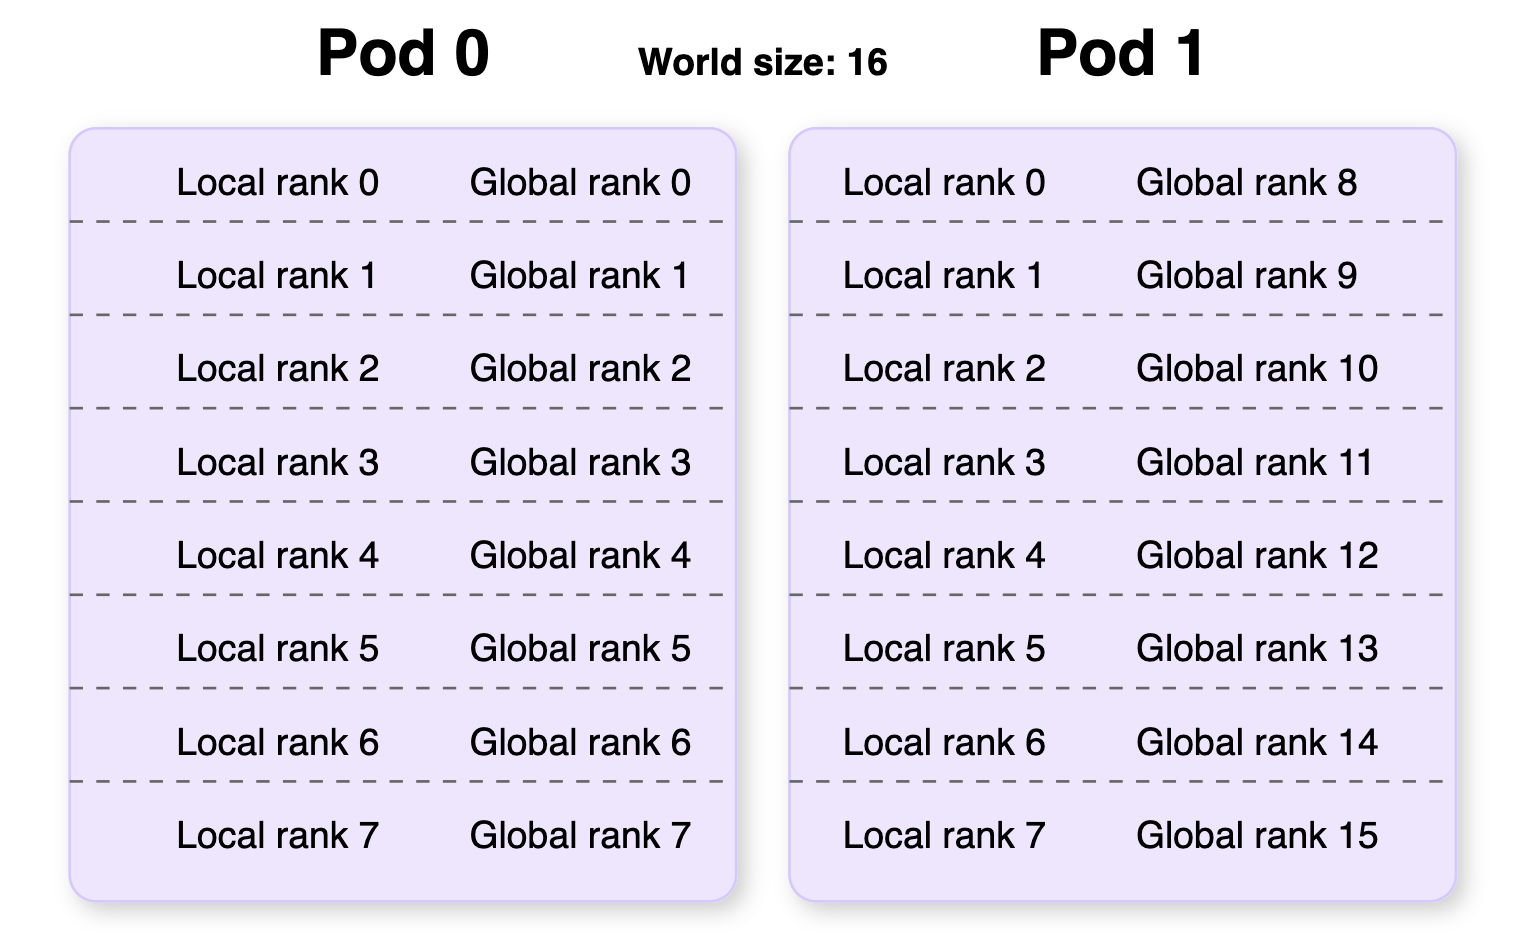
The first number refers to the global rank of the thread, spanning from `0` to `WORLD_SIZE-1` (`WORLD_SIZE` = the total number of GPUs in the cluster). In our example there are two Pods of eight GPUs, so the global rank spans from 0-15. The second number is the local rank, which defines the order of GPUs within a single Pod (0-7 for this example).
The specific number and order of ranks may be different in your terminal, and the global ranks listed will be different for each Pod.
This diagram illustrates how local and global ranks are distributed across multiple Pods:
 ## Step 5: Clean up
If you no longer need your cluster, make sure you return to the [Instant Clusters page](https://www.console.runpod.io/cluster) and delete your cluster to avoid incurring extra charges.
You can monitor your cluster usage and spending using the **Billing Explorer** at the bottom of the [Billing page](https://www.console.runpod.io/user/billing) section under the **Cluster** tab.
## Next steps
Now that you've successfully deployed and tested a PyTorch distributed application on an Instant Cluster, you can:
* **Adapt your own PyTorch code** to run on the cluster by modifying the distributed initialization in your scripts.
* **Scale your training** by adjusting the number of Pods in your cluster to handle larger models or datasets.
* **Try different frameworks** like [Axolotl](/instant-clusters/axolotl) for fine-tuning large language models.
* **Optimize performance** by experimenting with different distributed training strategies like Data Parallel (DP), Distributed Data Parallel (DDP), or Fully Sharded Data Parallel (FSDP).
* **Review the [configuration reference](/instant-clusters/configuration)** for detailed information on environment variables, network interfaces, and troubleshooting.
For more information on distributed training with PyTorch, refer to the [PyTorch Distributed Training documentation](https://pytorch.org/tutorials/beginner/dist_overview.html).
## Step 5: Clean up
If you no longer need your cluster, make sure you return to the [Instant Clusters page](https://www.console.runpod.io/cluster) and delete your cluster to avoid incurring extra charges.
You can monitor your cluster usage and spending using the **Billing Explorer** at the bottom of the [Billing page](https://www.console.runpod.io/user/billing) section under the **Cluster** tab.
## Next steps
Now that you've successfully deployed and tested a PyTorch distributed application on an Instant Cluster, you can:
* **Adapt your own PyTorch code** to run on the cluster by modifying the distributed initialization in your scripts.
* **Scale your training** by adjusting the number of Pods in your cluster to handle larger models or datasets.
* **Try different frameworks** like [Axolotl](/instant-clusters/axolotl) for fine-tuning large language models.
* **Optimize performance** by experimenting with different distributed training strategies like Data Parallel (DP), Distributed Data Parallel (DDP), or Fully Sharded Data Parallel (FSDP).
* **Review the [configuration reference](/instant-clusters/configuration)** for detailed information on environment variables, network interfaces, and troubleshooting.
For more information on distributed training with PyTorch, refer to the [PyTorch Distributed Training documentation](https://pytorch.org/tutorials/beginner/dist_overview.html).