> ## Documentation Index
> Fetch the complete documentation index at: https://docs.runpod.io/llms.txt
> Use this file to discover all available pages before exploring further.
# CopyParty file manager
> Web-based GUI for easy file browsing, uploading, downloading, and media viewing on Runpod
# Setting up CopyParty on Runpod
CopyParty provides a webbased GUI that makes file management simple on Runpod instances. With its intuitive interface, you can browse directories, upload/download files, preview images and videos, and manage your Pod's filesystem without complex command-line operations.
## About CopyParty
CopyParty is an open-source project created that provides a portable file server with a web UI. It's perfect for managing files on cloud GPU instances where traditional file transfer methods might be cumbersome.
For a video demonstration, you can watch the [creator's YouTube tutorial](https://youtu.be/15_-hgsX2V0?si=AXArKvI79LEscpNn).
Check the repository for additional features, updates, and documentation: [github.com/9001/copyparty](https://github.com/9001/copyparty)
## Requirements
To use CopyParty on Runpod, you need:
* **Terminal access to your Pod** - Either through web terminal or Jupyter Labs terminal.
* An available HTTP port on your Pod.
* A supported OS in the Docker base image.
CopyParty has been tested on Ubuntu-based Docker images and Runpod Official templates. When using custom templates or alternative Docker bases (like Python Slim) you may encounter file system dependency errors. Refer to the [GitHub repository](https://github.com/9001/copyparty) for details on OS support.
### Verifying terminal access
You can access the terminal in two ways:
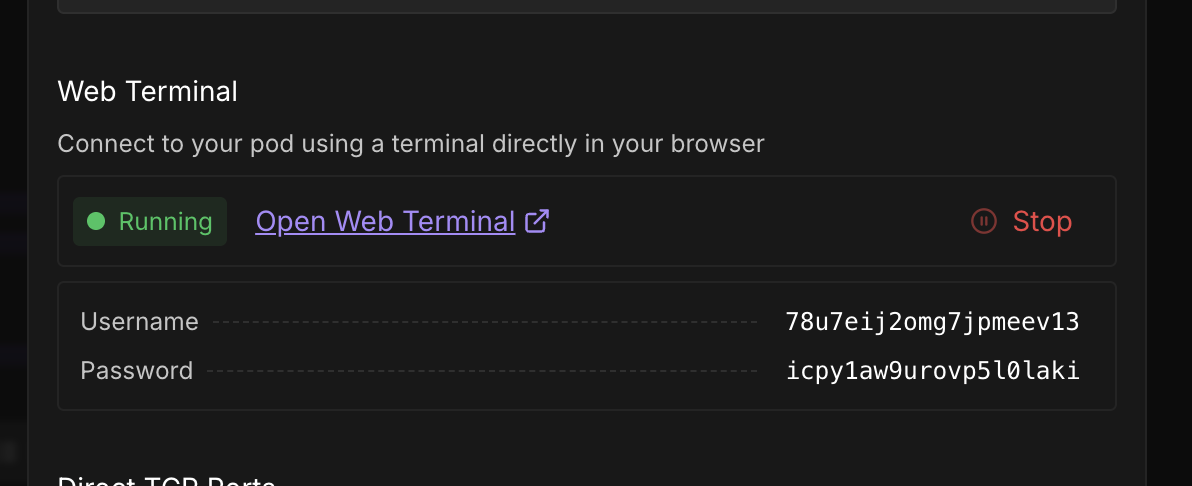
#### Option 1: Web terminal
If you see this option when clicking "Connect" on your Pod page, you have web terminal access:
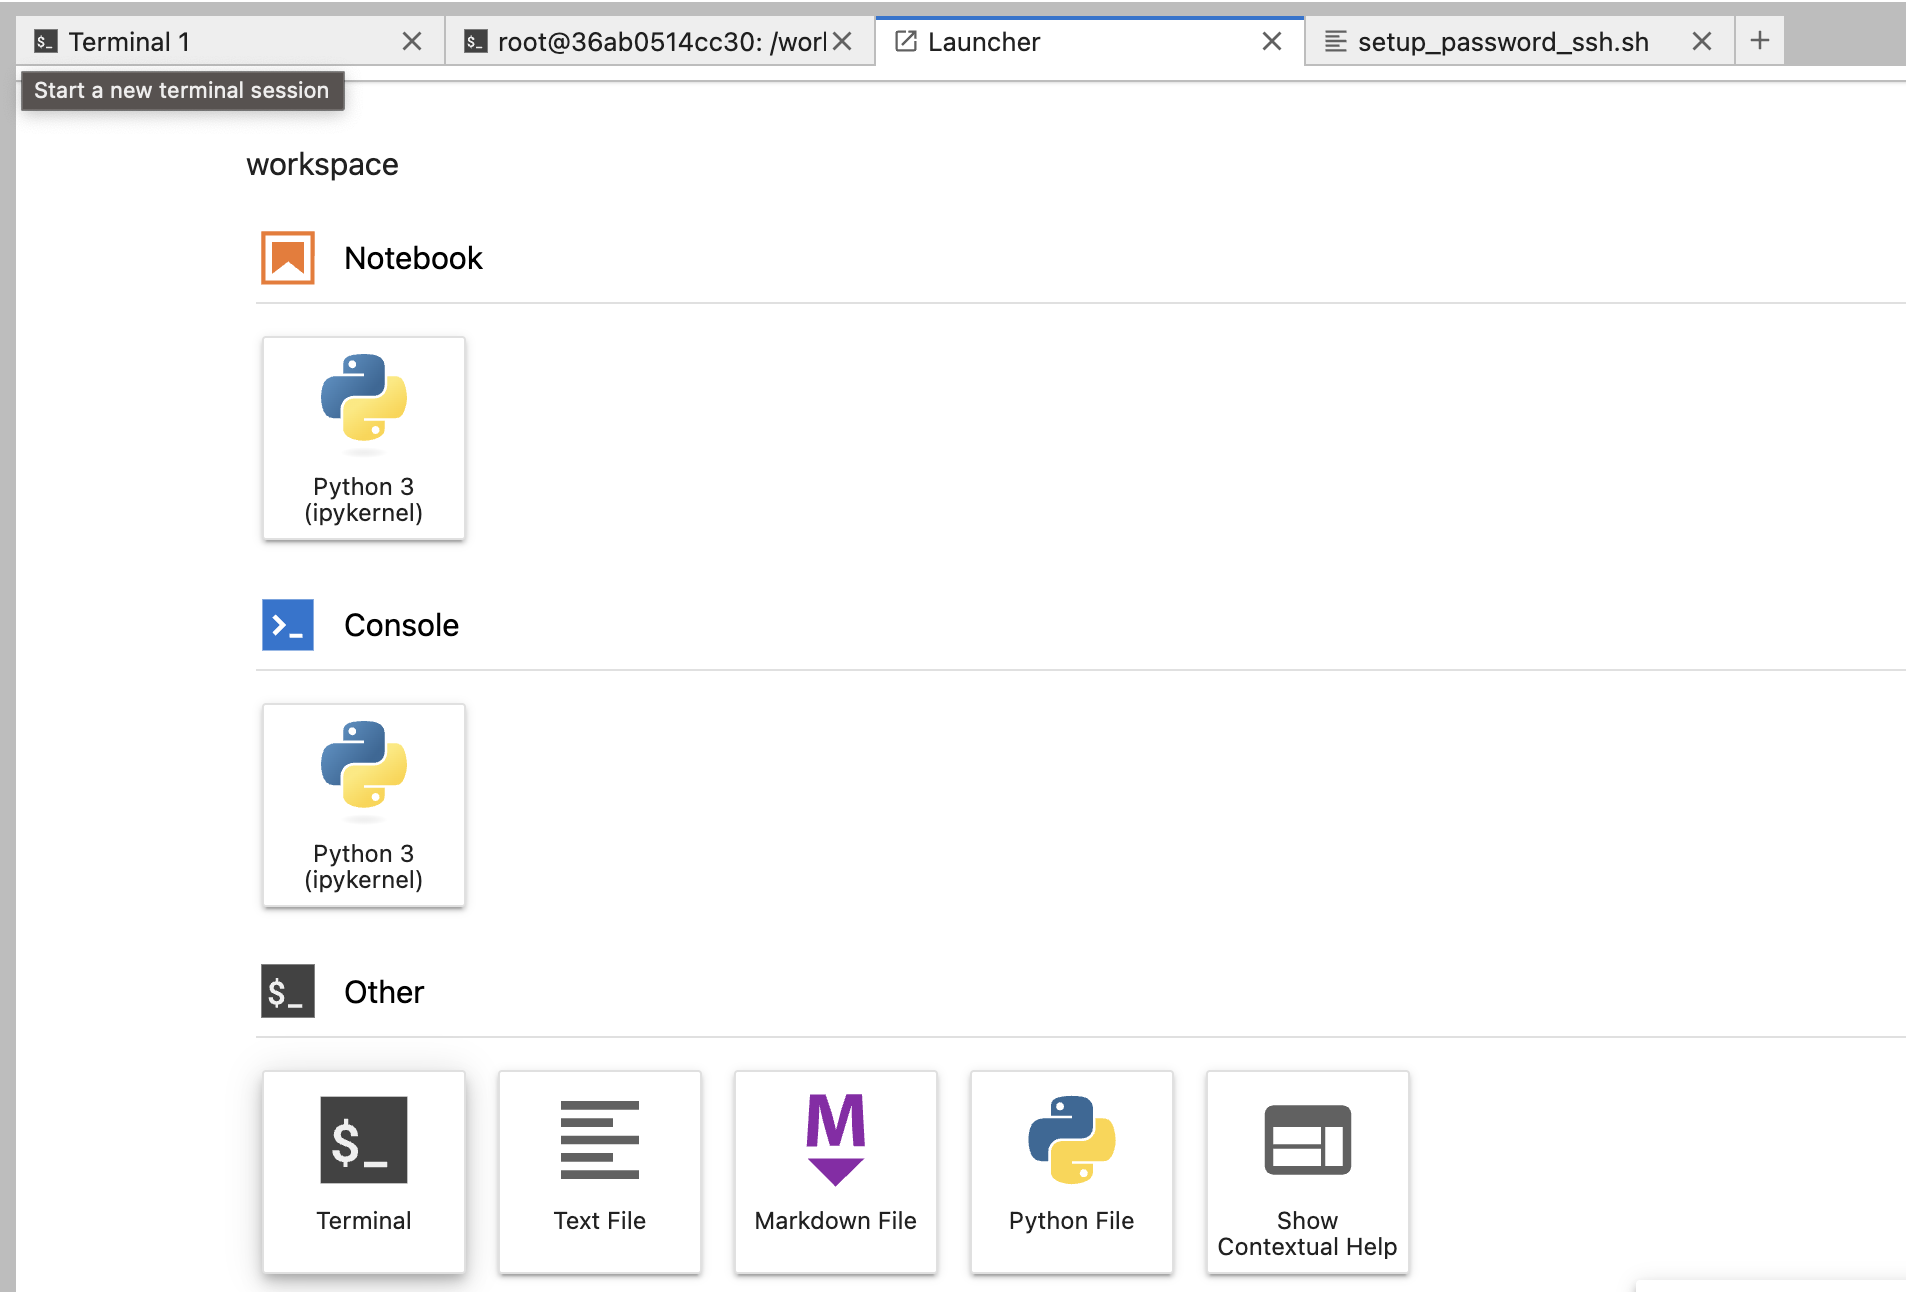
 #### Option 2: JupyterLab terminal
If you have JupyterLab installed on your Pod, you can access the terminal there:
#### Option 2: JupyterLab terminal
If you have JupyterLab installed on your Pod, you can access the terminal there:
 ## Installation steps
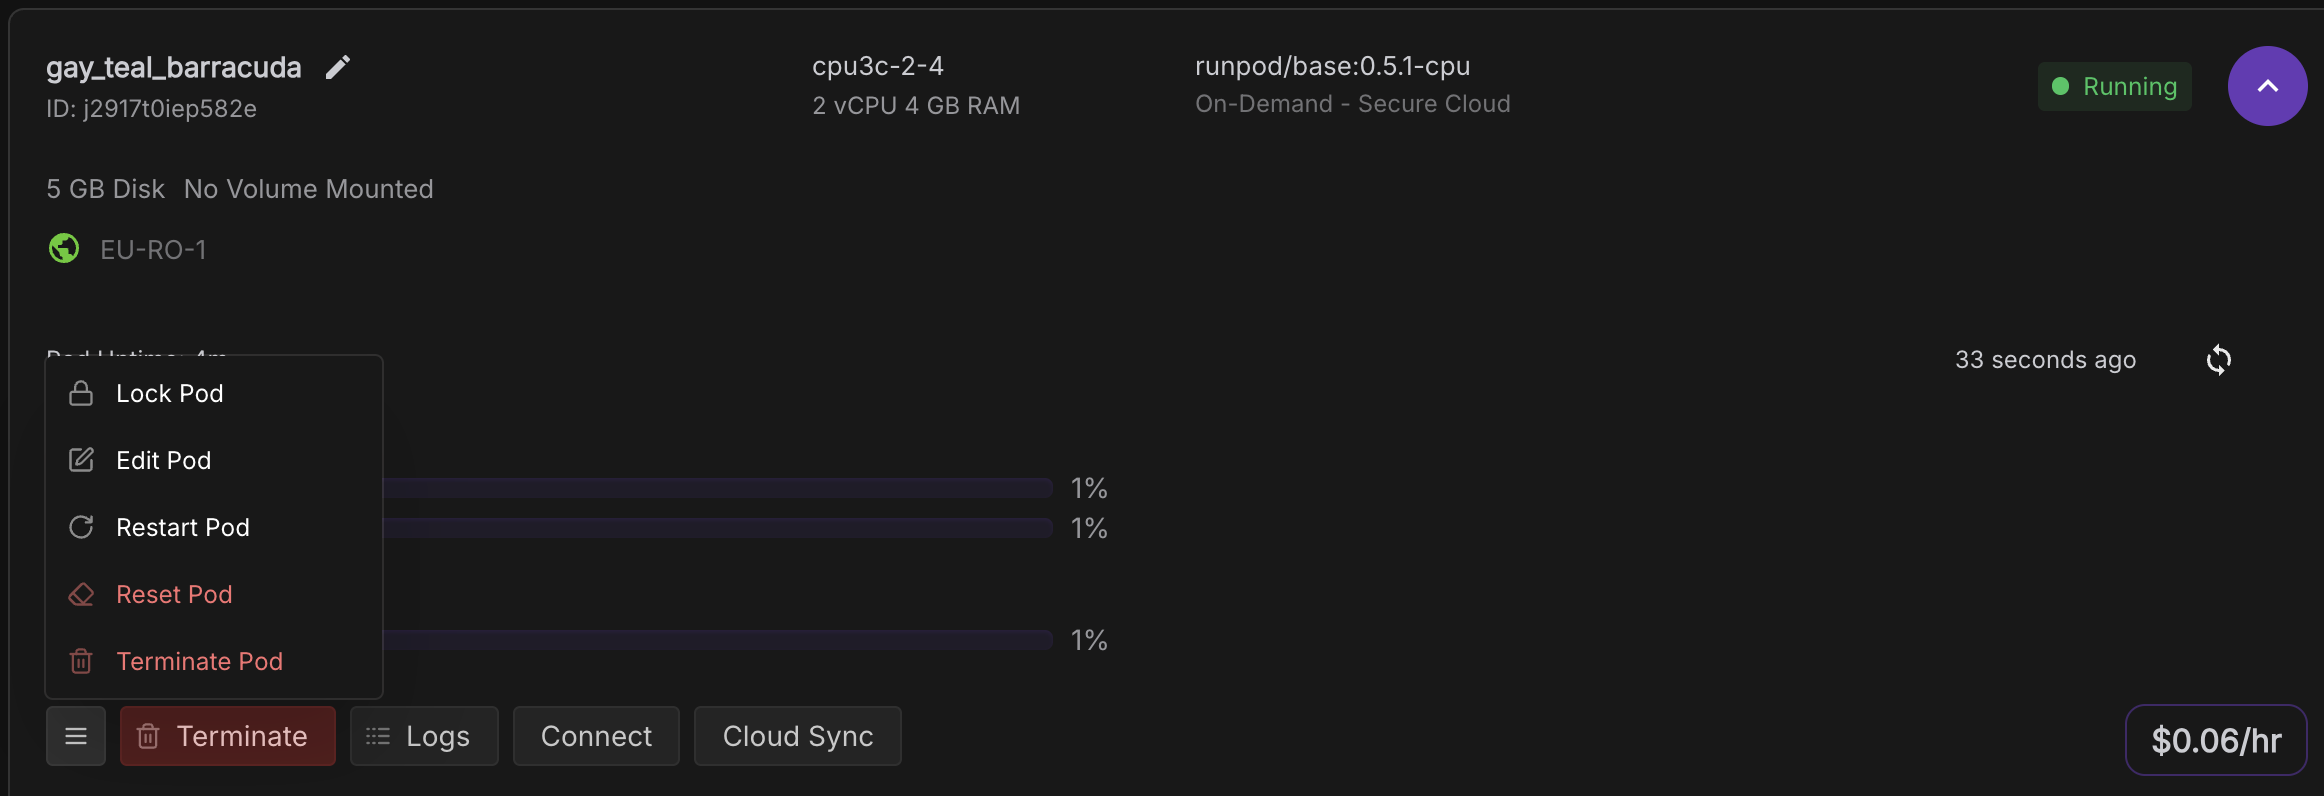
### Step 1: Access your Pod settings
Navigate to your Pod page and locate the settings:
## Installation steps
### Step 1: Access your Pod settings
Navigate to your Pod page and locate the settings:
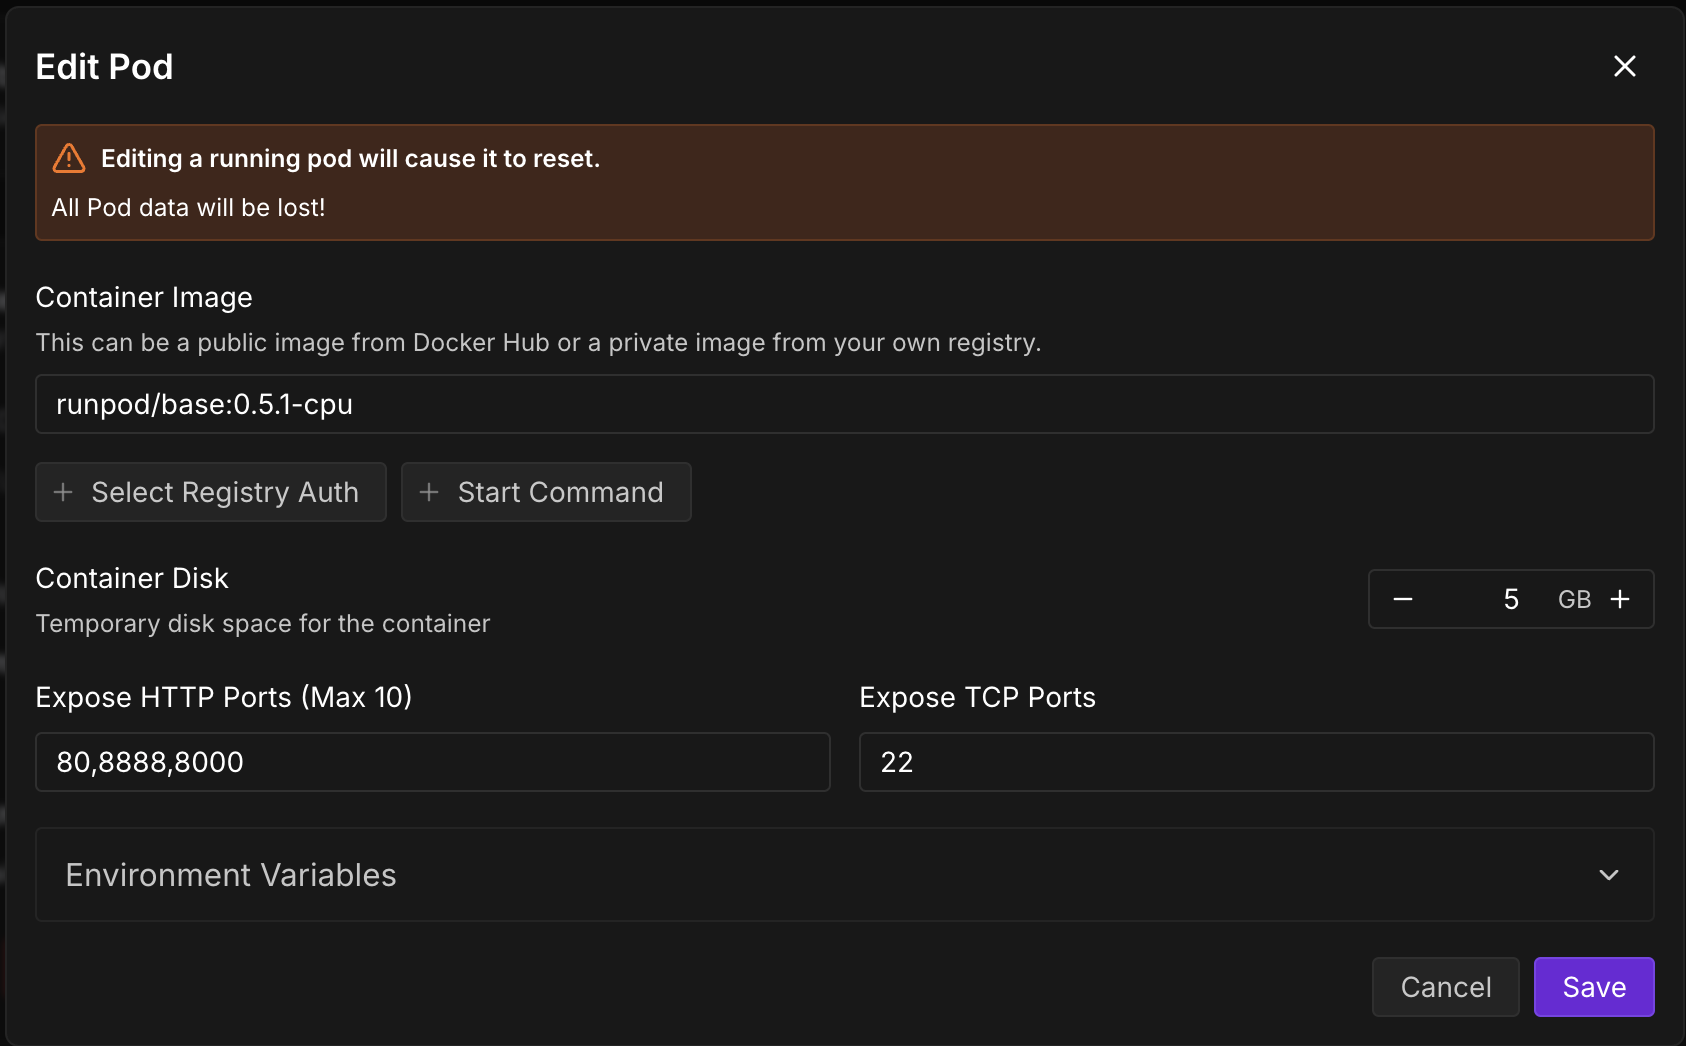
 ### Step 2: Add an HTTP port
**Adding a new port will restart your Pod and erase any data not stored in `/workspace`**
Before proceeding, ensure all important files are saved in `/workspace` or backed up elsewhere. Any installed libraries or files outside of `/workspace` will be lost.
Add a dedicated HTTP port for the CopyParty interface. If port 8888 is already in use (common for Jupyter), try port 8000 or another available port.
### Step 2: Add an HTTP port
**Adding a new port will restart your Pod and erase any data not stored in `/workspace`**
Before proceeding, ensure all important files are saved in `/workspace` or backed up elsewhere. Any installed libraries or files outside of `/workspace` will be lost.
Add a dedicated HTTP port for the CopyParty interface. If port 8888 is already in use (common for Jupyter), try port 8000 or another available port.
 ### Step 3: Install and run CopyParty
Open your terminal (web terminal or Jupyter terminal) and run one of the following commands:
#### Option 1: Standard installation
Run CopyParty directly (the session will end if you close the terminal):
```bash theme={"theme":{"light":"github-light","dark":"github-dark"}}
curl -LsSf https://astral.sh/uv/install.sh | sh && source $HOME/.local/bin/env && uv tool run copyparty -p 8000 --allow-csrf
```
Replace `-p 8000` with your chosen port number if different.
#### Option 2: Background installation with tmux
To keep CopyParty running even after closing the terminal, use `tmux`:
```bash theme={"theme":{"light":"github-light","dark":"github-dark"}}
apt-get update && apt-get install tmux -y && tmux new-session -d -s copyparty 'curl -LsSf https://astral.sh/uv/install.sh | sh && source $HOME/.local/bin/env && uv tool run copyparty -p 8000 --allow-csrf' && tmux attach -t copyparty
```
**What is tmux?**
`tmux` (terminal multiplexer) is a tool that lets you run terminal sessions in the background. Think of it as a way to keep programs running even after you close your terminal window, like minimizing an app instead of closing it. This is particularly useful on Runpod where you want CopyParty to keep running even if you disconnect.
For a more in-depth tmux tutorial, check out this [comprehensive video guide](https://youtu.be/nTqu6w2wc68?si=OcI3qbh2kGH7_3fh).
This command:
1. Installs tmux (a terminal multiplexer)
2. Creates a new tmux session named "copyparty"
3. Runs CopyParty in the background
4. Attaches you to the session to see the output
**Quick tmux Commands**
* To detach from tmux and leave CopyParty running: Press `Ctrl+B` then `D`
* To reattach to the session later: `tmux attach -t copyparty`
* To stop CopyParty: Reattach and press `Ctrl+C`
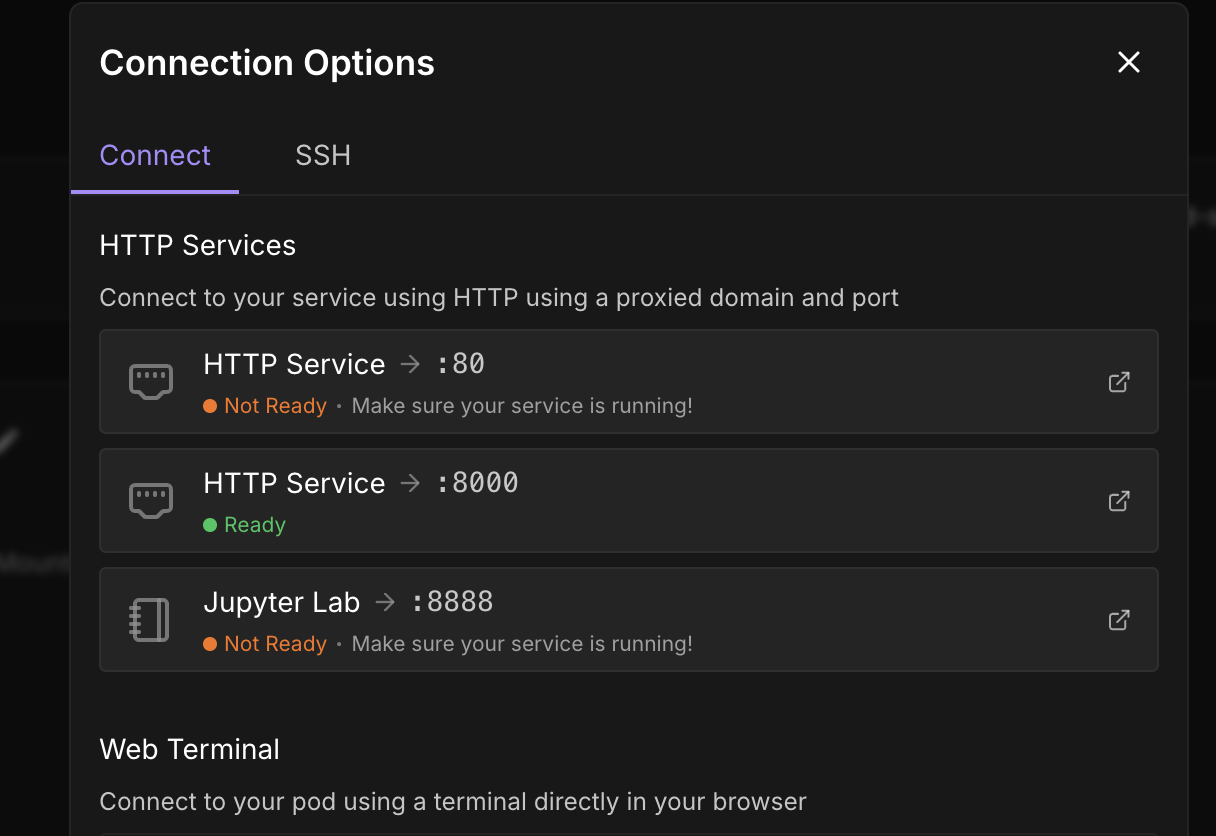
### Step 4: Access the CopyParty interface
Once CopyParty is running, click on the port number in your Runpod dashboard:
### Step 3: Install and run CopyParty
Open your terminal (web terminal or Jupyter terminal) and run one of the following commands:
#### Option 1: Standard installation
Run CopyParty directly (the session will end if you close the terminal):
```bash theme={"theme":{"light":"github-light","dark":"github-dark"}}
curl -LsSf https://astral.sh/uv/install.sh | sh && source $HOME/.local/bin/env && uv tool run copyparty -p 8000 --allow-csrf
```
Replace `-p 8000` with your chosen port number if different.
#### Option 2: Background installation with tmux
To keep CopyParty running even after closing the terminal, use `tmux`:
```bash theme={"theme":{"light":"github-light","dark":"github-dark"}}
apt-get update && apt-get install tmux -y && tmux new-session -d -s copyparty 'curl -LsSf https://astral.sh/uv/install.sh | sh && source $HOME/.local/bin/env && uv tool run copyparty -p 8000 --allow-csrf' && tmux attach -t copyparty
```
**What is tmux?**
`tmux` (terminal multiplexer) is a tool that lets you run terminal sessions in the background. Think of it as a way to keep programs running even after you close your terminal window, like minimizing an app instead of closing it. This is particularly useful on Runpod where you want CopyParty to keep running even if you disconnect.
For a more in-depth tmux tutorial, check out this [comprehensive video guide](https://youtu.be/nTqu6w2wc68?si=OcI3qbh2kGH7_3fh).
This command:
1. Installs tmux (a terminal multiplexer)
2. Creates a new tmux session named "copyparty"
3. Runs CopyParty in the background
4. Attaches you to the session to see the output
**Quick tmux Commands**
* To detach from tmux and leave CopyParty running: Press `Ctrl+B` then `D`
* To reattach to the session later: `tmux attach -t copyparty`
* To stop CopyParty: Reattach and press `Ctrl+C`
### Step 4: Access the CopyParty interface
Once CopyParty is running, click on the port number in your Runpod dashboard:
 ## Using CopyParty
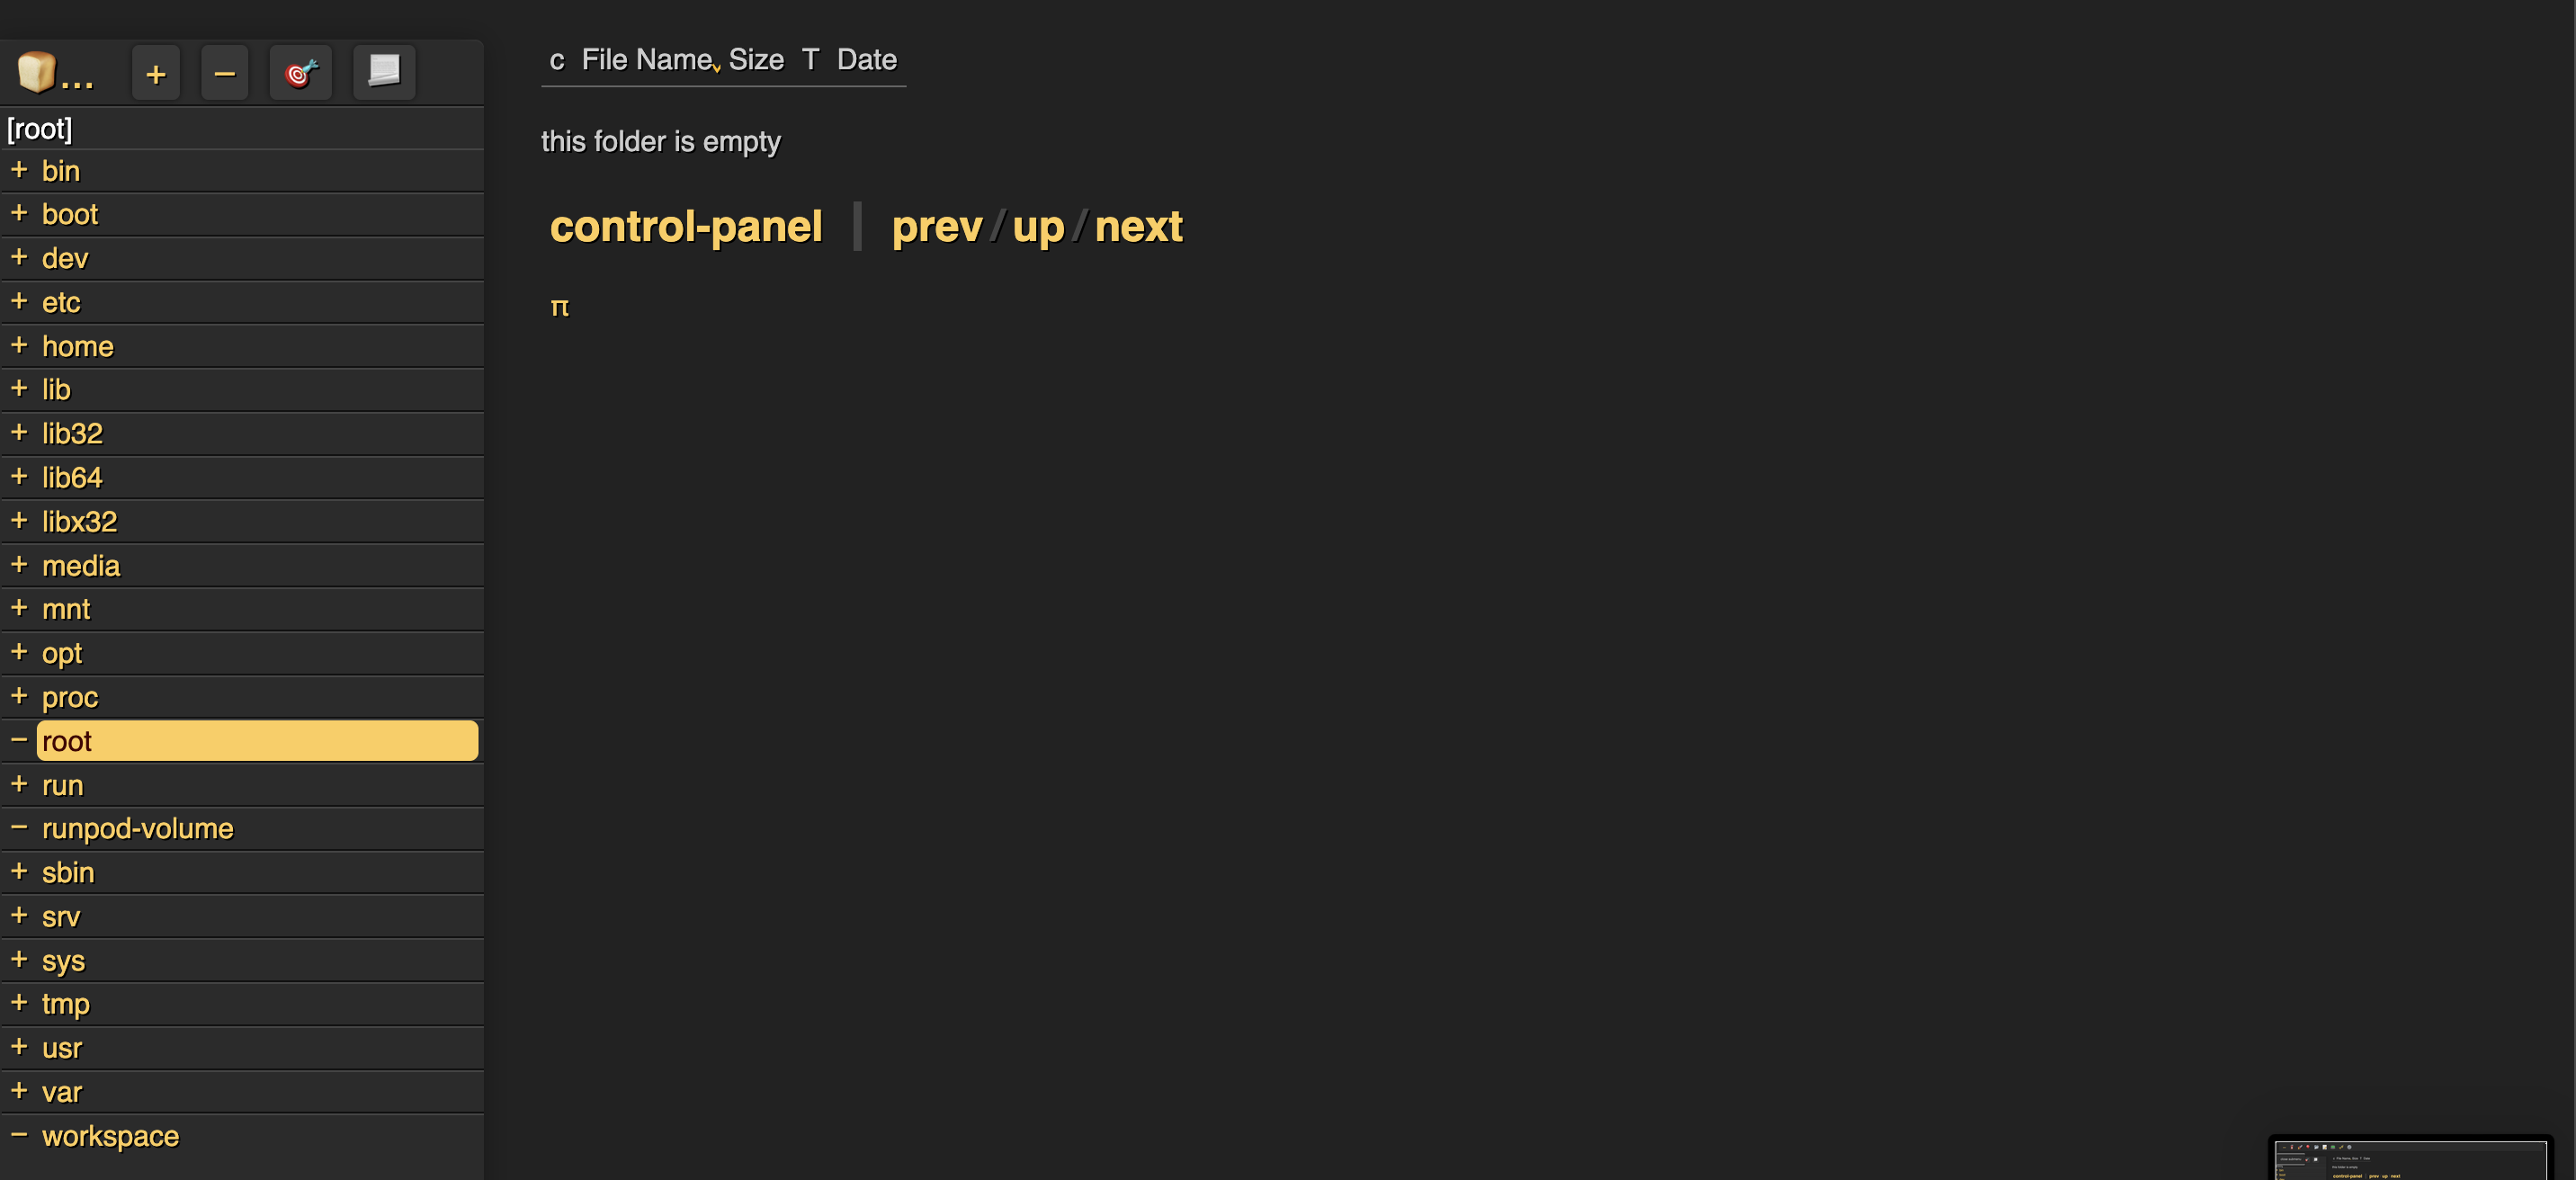
### File navigation
The interface displays your file system on the left side:
## Using CopyParty
### File navigation
The interface displays your file system on the left side:
 ### Uploading files
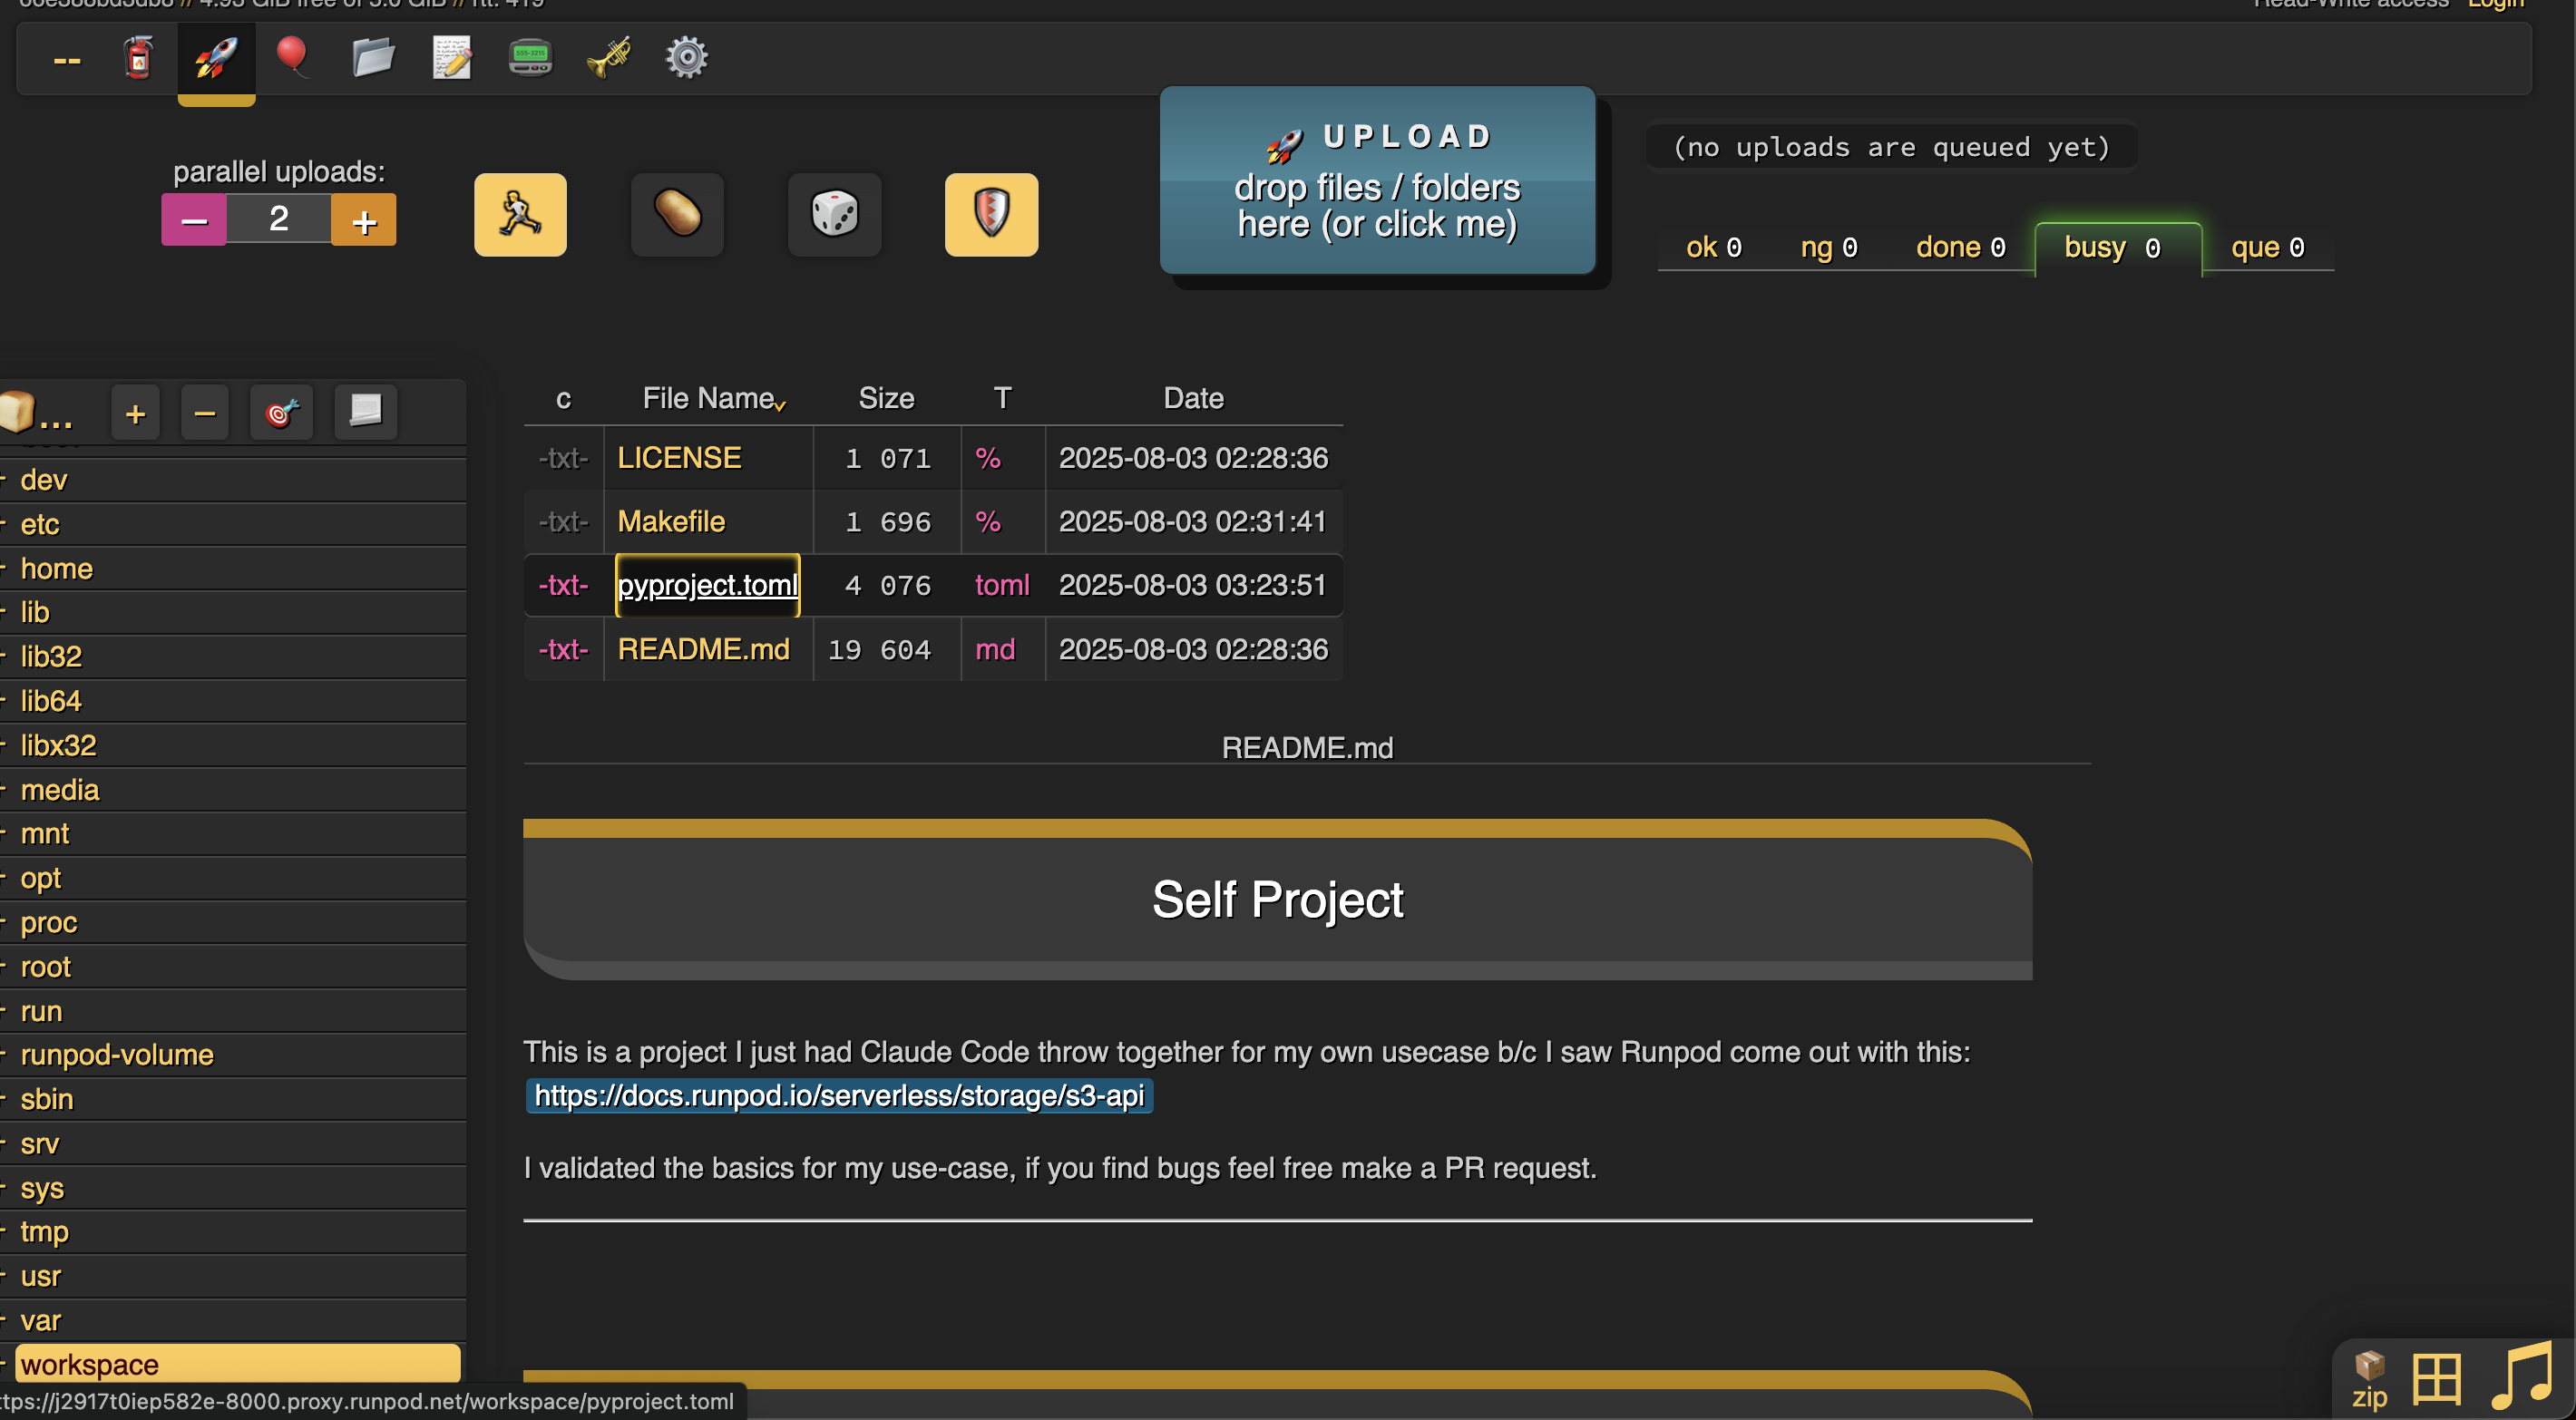
Simply drag and drop files into the interface to upload them:
### Uploading files
Simply drag and drop files into the interface to upload them:
 ### Downloading files
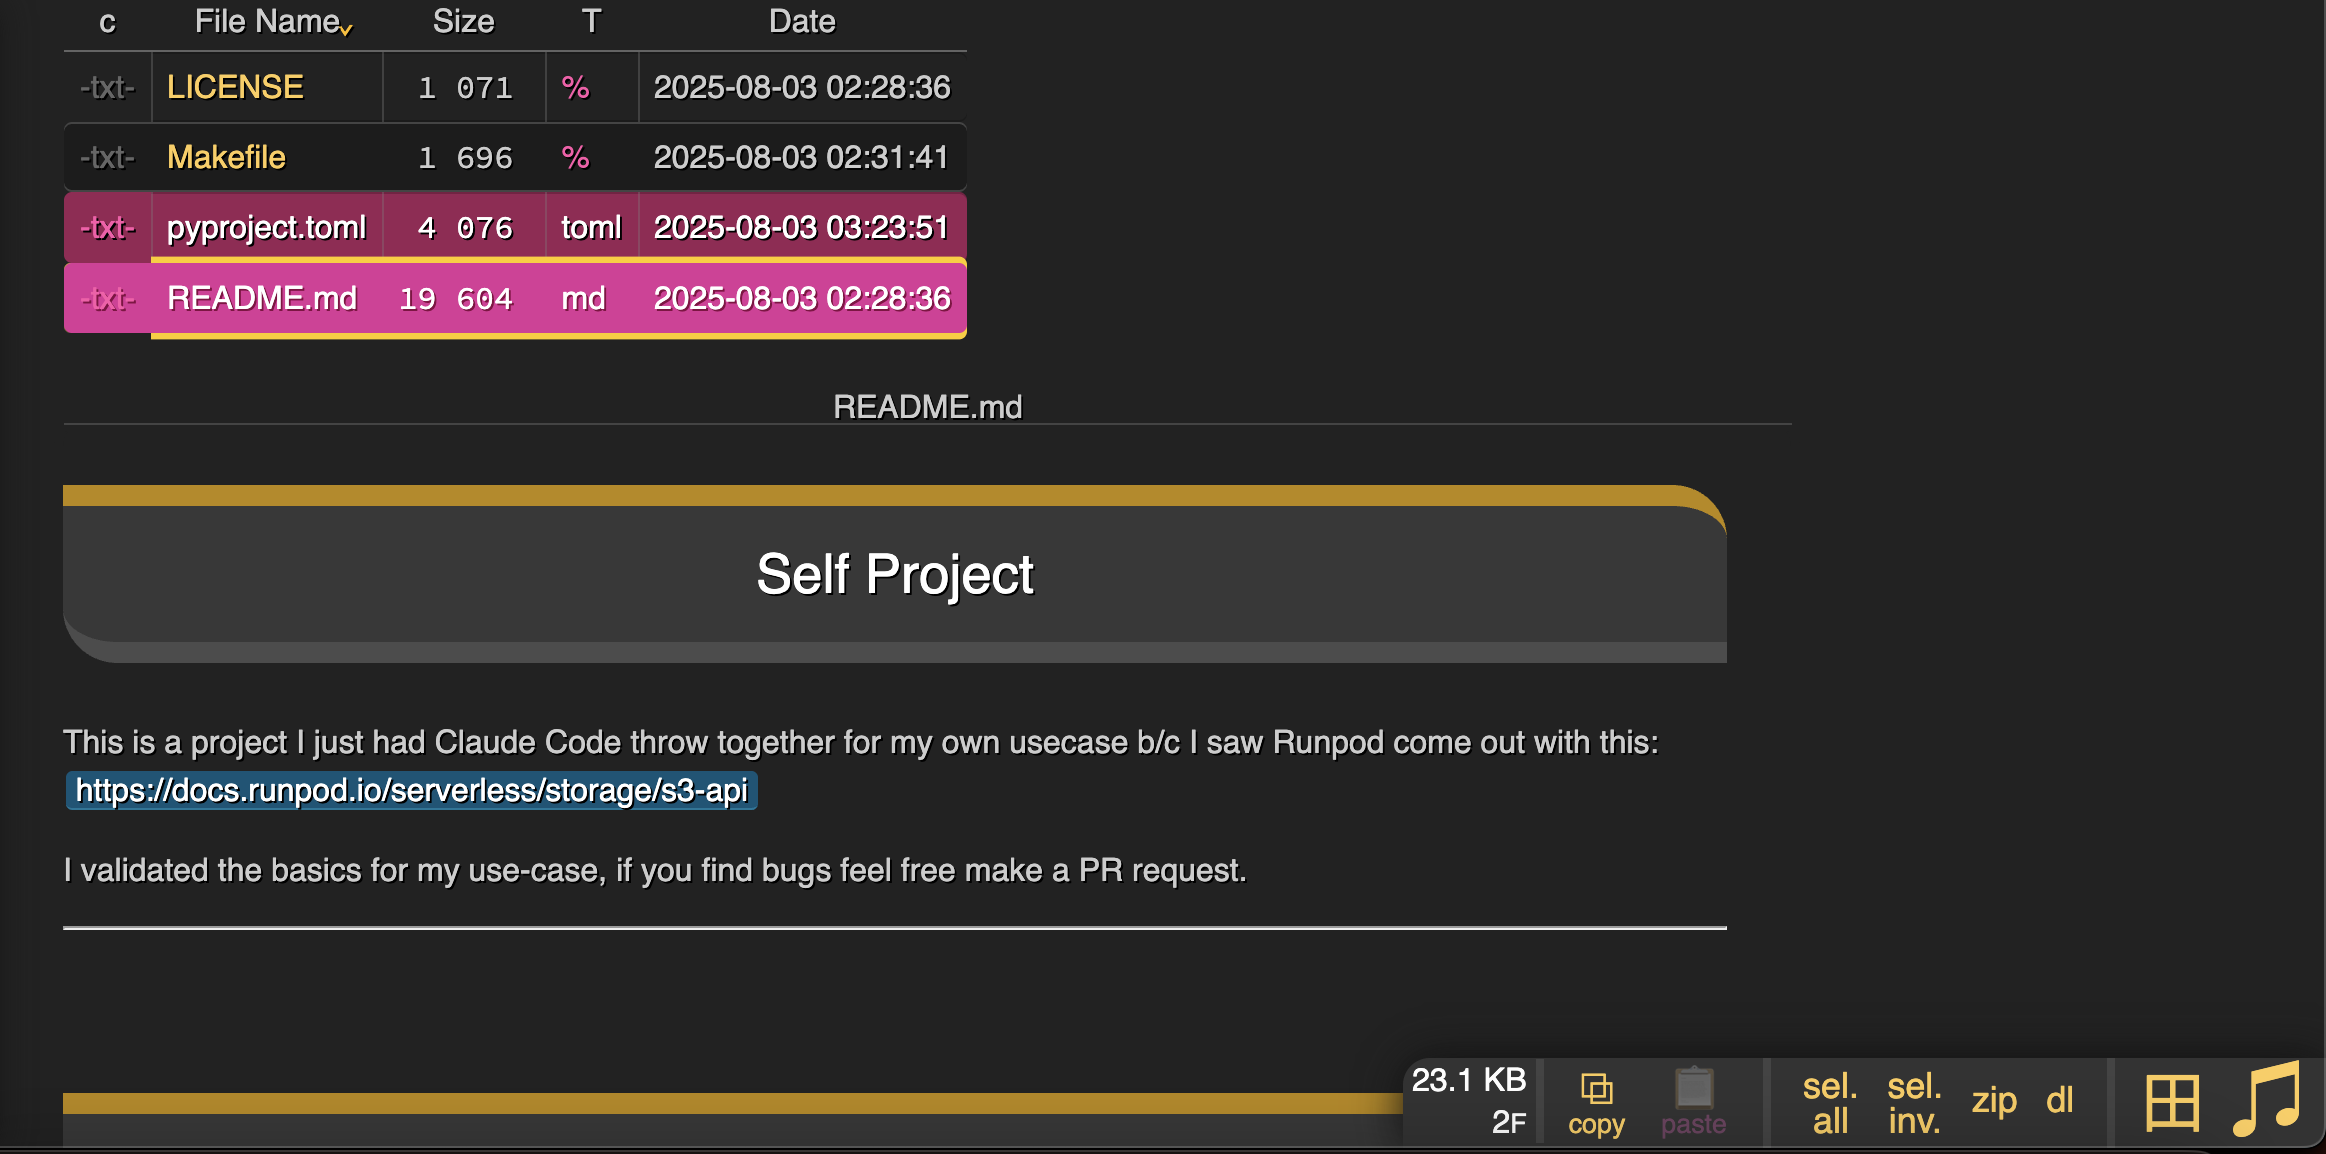
To download files:
1. Click on files to select them (they'll be highlighted in pink)
2. Use the buttons in the bottom right:
* **"dl"** - Download individual files
* **"zip"** - Download multiple files as a zip archive
### Downloading files
To download files:
1. Click on files to select them (they'll be highlighted in pink)
2. Use the buttons in the bottom right:
* **"dl"** - Download individual files
* **"zip"** - Download multiple files as a zip archive
 ## Tips and best practices
1. **Data Persistence**: Always store important files in `/workspace` to survive pod restarts
2. **Port Selection**: Choose a port that doesn't conflict with other services (avoid 8888 if using Jupyter)
3. **Large Files**: CopyParty handles large file transfers well, making it ideal for model weights and datasets
## Troubleshooting
### Session ends when terminal closes
Use the tmux option (Option 2) to keep CopyParty running in the background
## Alternative file transfer methods
While CopyParty provides an excellent web-based solution, Runpod also supports:
* Direct SSH/SCP transfers (if SSH is enabled)
* JupyterLab file browser
* [Runpod CLI](/runpodctl/overview) tool
* [Cloud storage integration](/pods/storage/cloud-sync) (S3, Google Drive, etc.)
Choose the method that best fits your workflow and security requirements.
## Tips and best practices
1. **Data Persistence**: Always store important files in `/workspace` to survive pod restarts
2. **Port Selection**: Choose a port that doesn't conflict with other services (avoid 8888 if using Jupyter)
3. **Large Files**: CopyParty handles large file transfers well, making it ideal for model weights and datasets
## Troubleshooting
### Session ends when terminal closes
Use the tmux option (Option 2) to keep CopyParty running in the background
## Alternative file transfer methods
While CopyParty provides an excellent web-based solution, Runpod also supports:
* Direct SSH/SCP transfers (if SSH is enabled)
* JupyterLab file browser
* [Runpod CLI](/runpodctl/overview) tool
* [Cloud storage integration](/pods/storage/cloud-sync) (S3, Google Drive, etc.)
Choose the method that best fits your workflow and security requirements.